Rosemary Ranch Chicken Kabobs
September 16, 2013
Now I know it’s after Labor Day, but I’m still trying to hold on to summer by grilling until I can’t stand being outside in the cold! (Then Jason graciously volunteers to go outside and man the grill.) This is one of my absolute favorite chicken kabob recipes. The marinade is so easy to prepare, flavorful, and the best part is, I’ve never had the chicken turn out dry! Plus, who doesn’t like ranch dressing? I’ll marinade a couple of chicken breasts, skewer up some peppers, mushrooms and onions to throw on the grill and dinner is ready in about 30 minutes (well more than that if you count marinading the chicken.) A quick meal is key at our house right now, Jason’s been busy with work and I’m still in the middle of training for my half-marathon (only 5 more weeks to go! I love running, but it will be nice when I don’t have to spend hours each day training) and the last thing either of us want to do is cook an elaborate meal that takes hours.
Ingredients
1/4 c olive oil
1/4 c light ranch dressing
1 1/2 T Worcestershire sauce
1 T dried rosemary
1 t lemon juice
1 t white vinegar
salt/pepper to taste (although I’ve never used them)
2 chicken breasts
1. Mix the marinade together
In a medium size bowl, stir together the olive oil, ranch dressing, Worcestershire sauce, rosemary, lemon juice, white vinegar and salt/pepper if you like. Because the olive oil and ranch don’t want to play nice together, it will take some stirring to get everything to come together.
2. Chop the chicken into pieces and add to the marinade
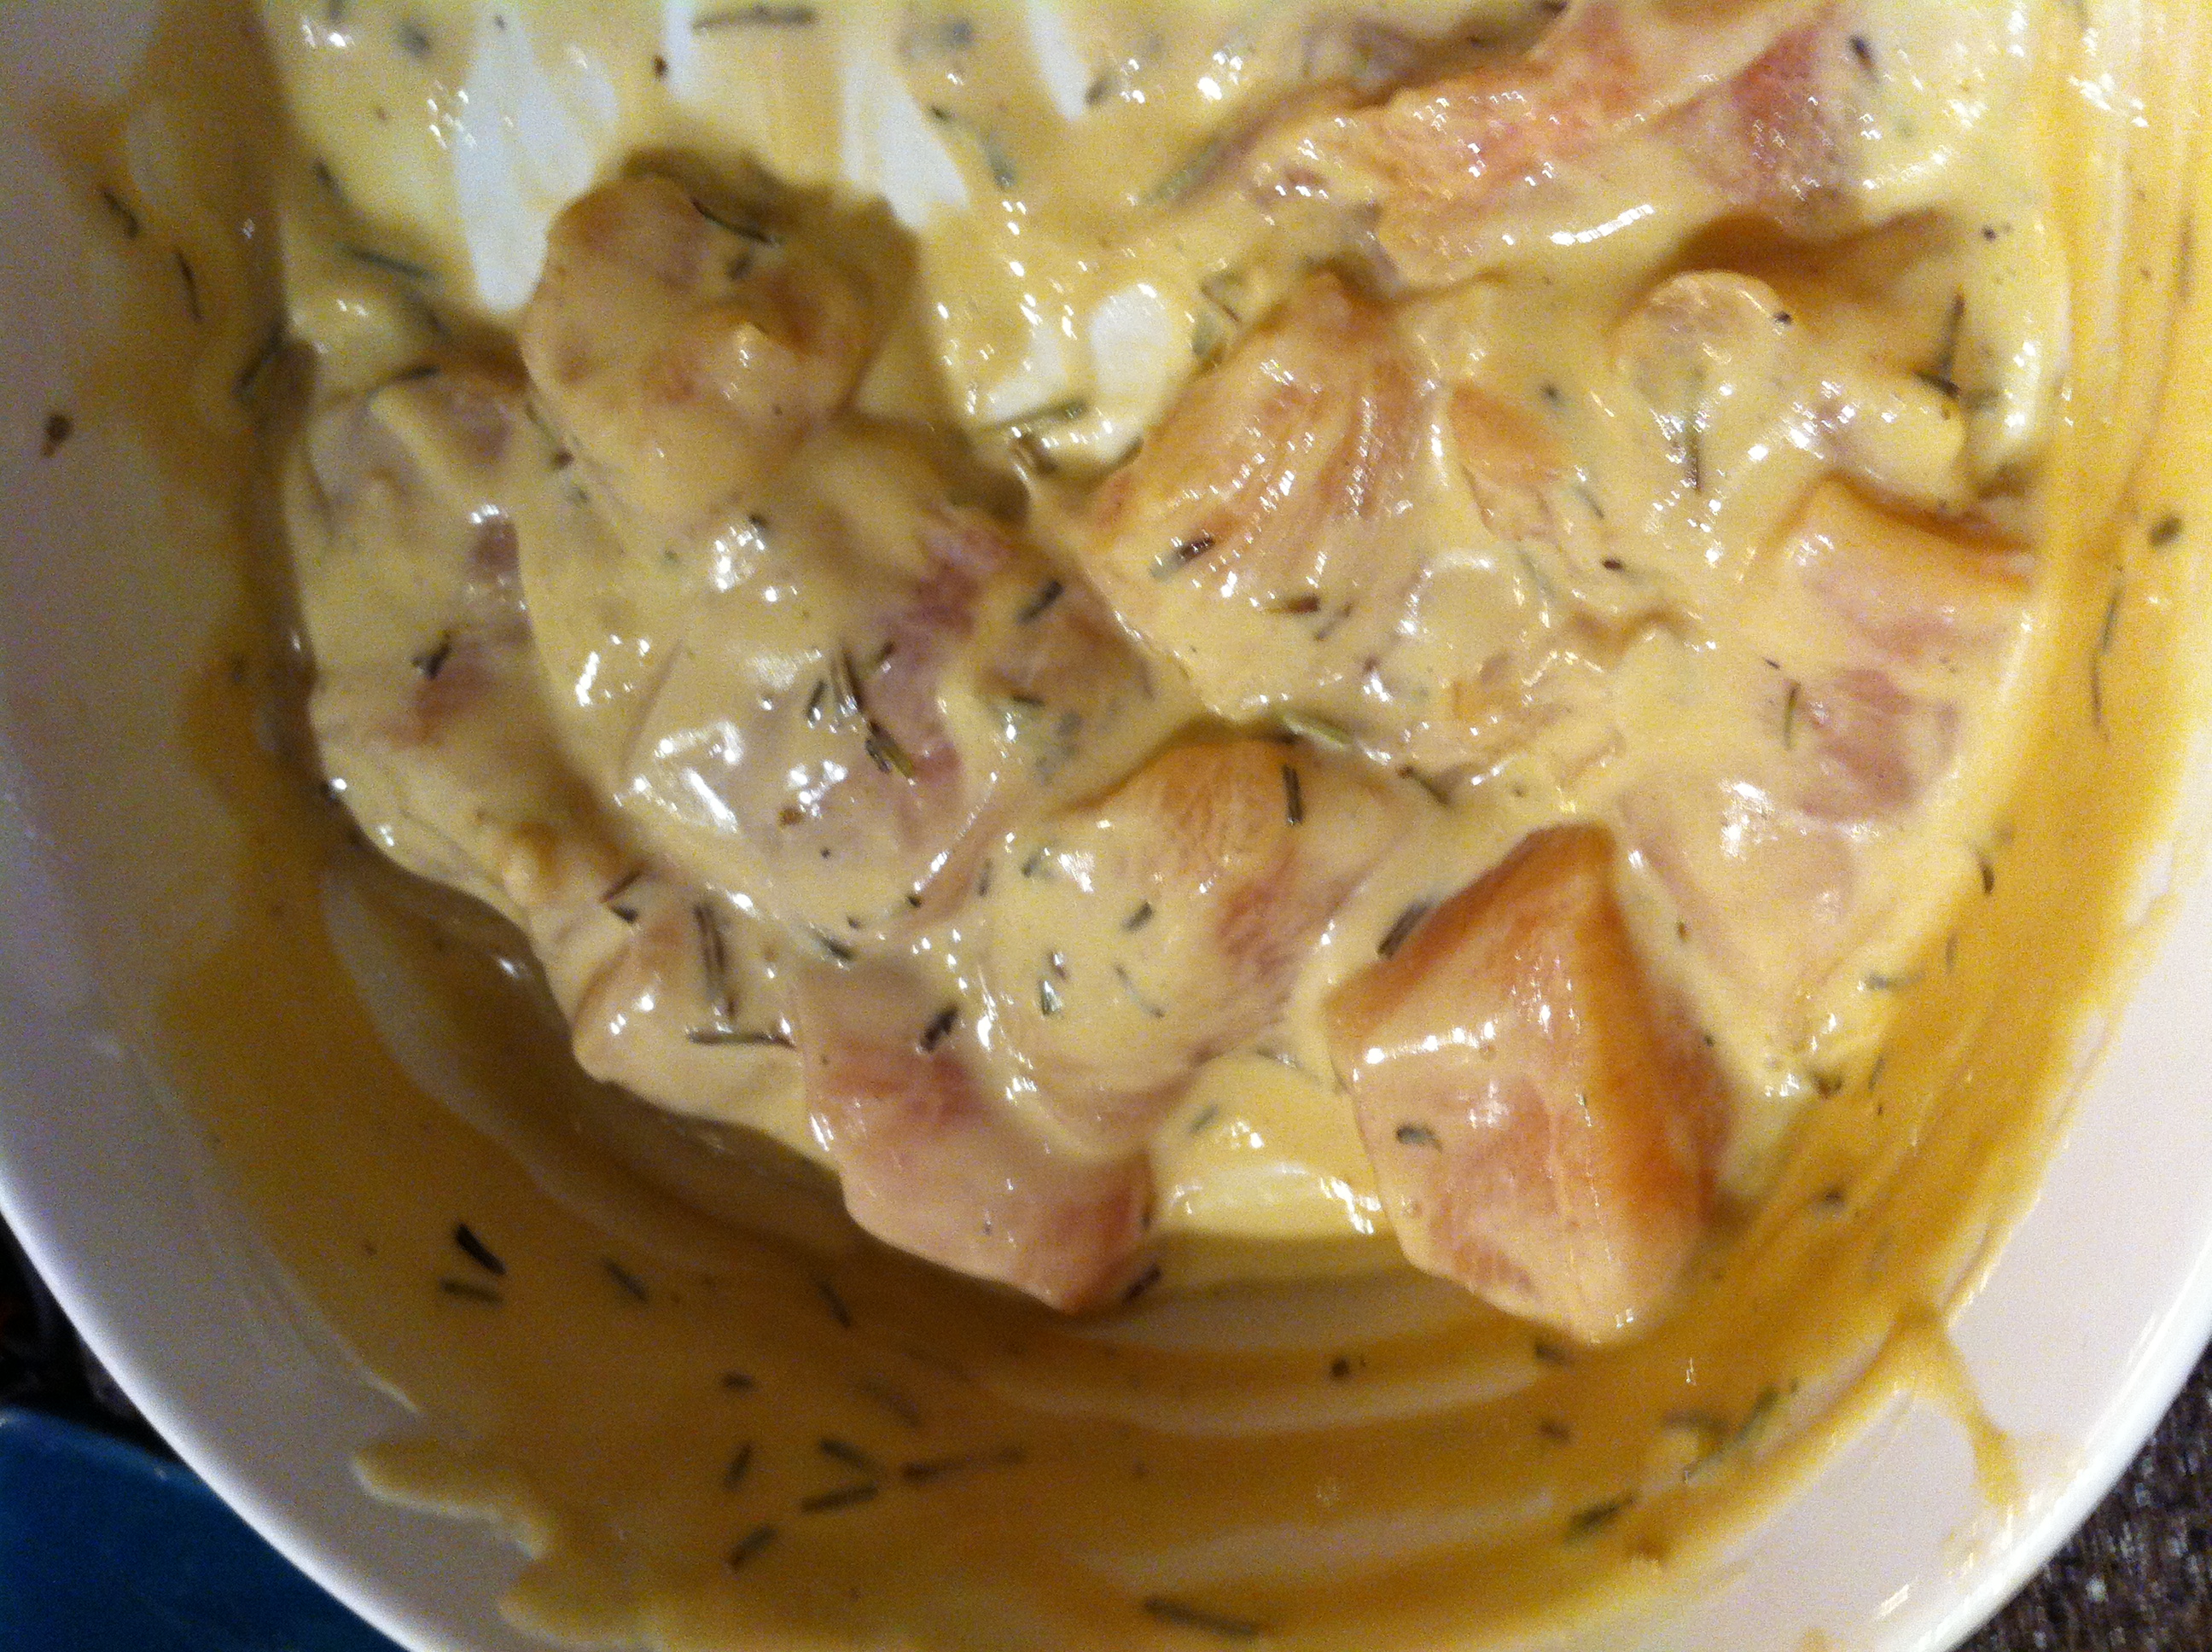
3. Cover and refrigerate at least 30 minutes
I love to prep the marinade and chicken the night before and let it sit over night. I think it helps make the chicken more flavorful!
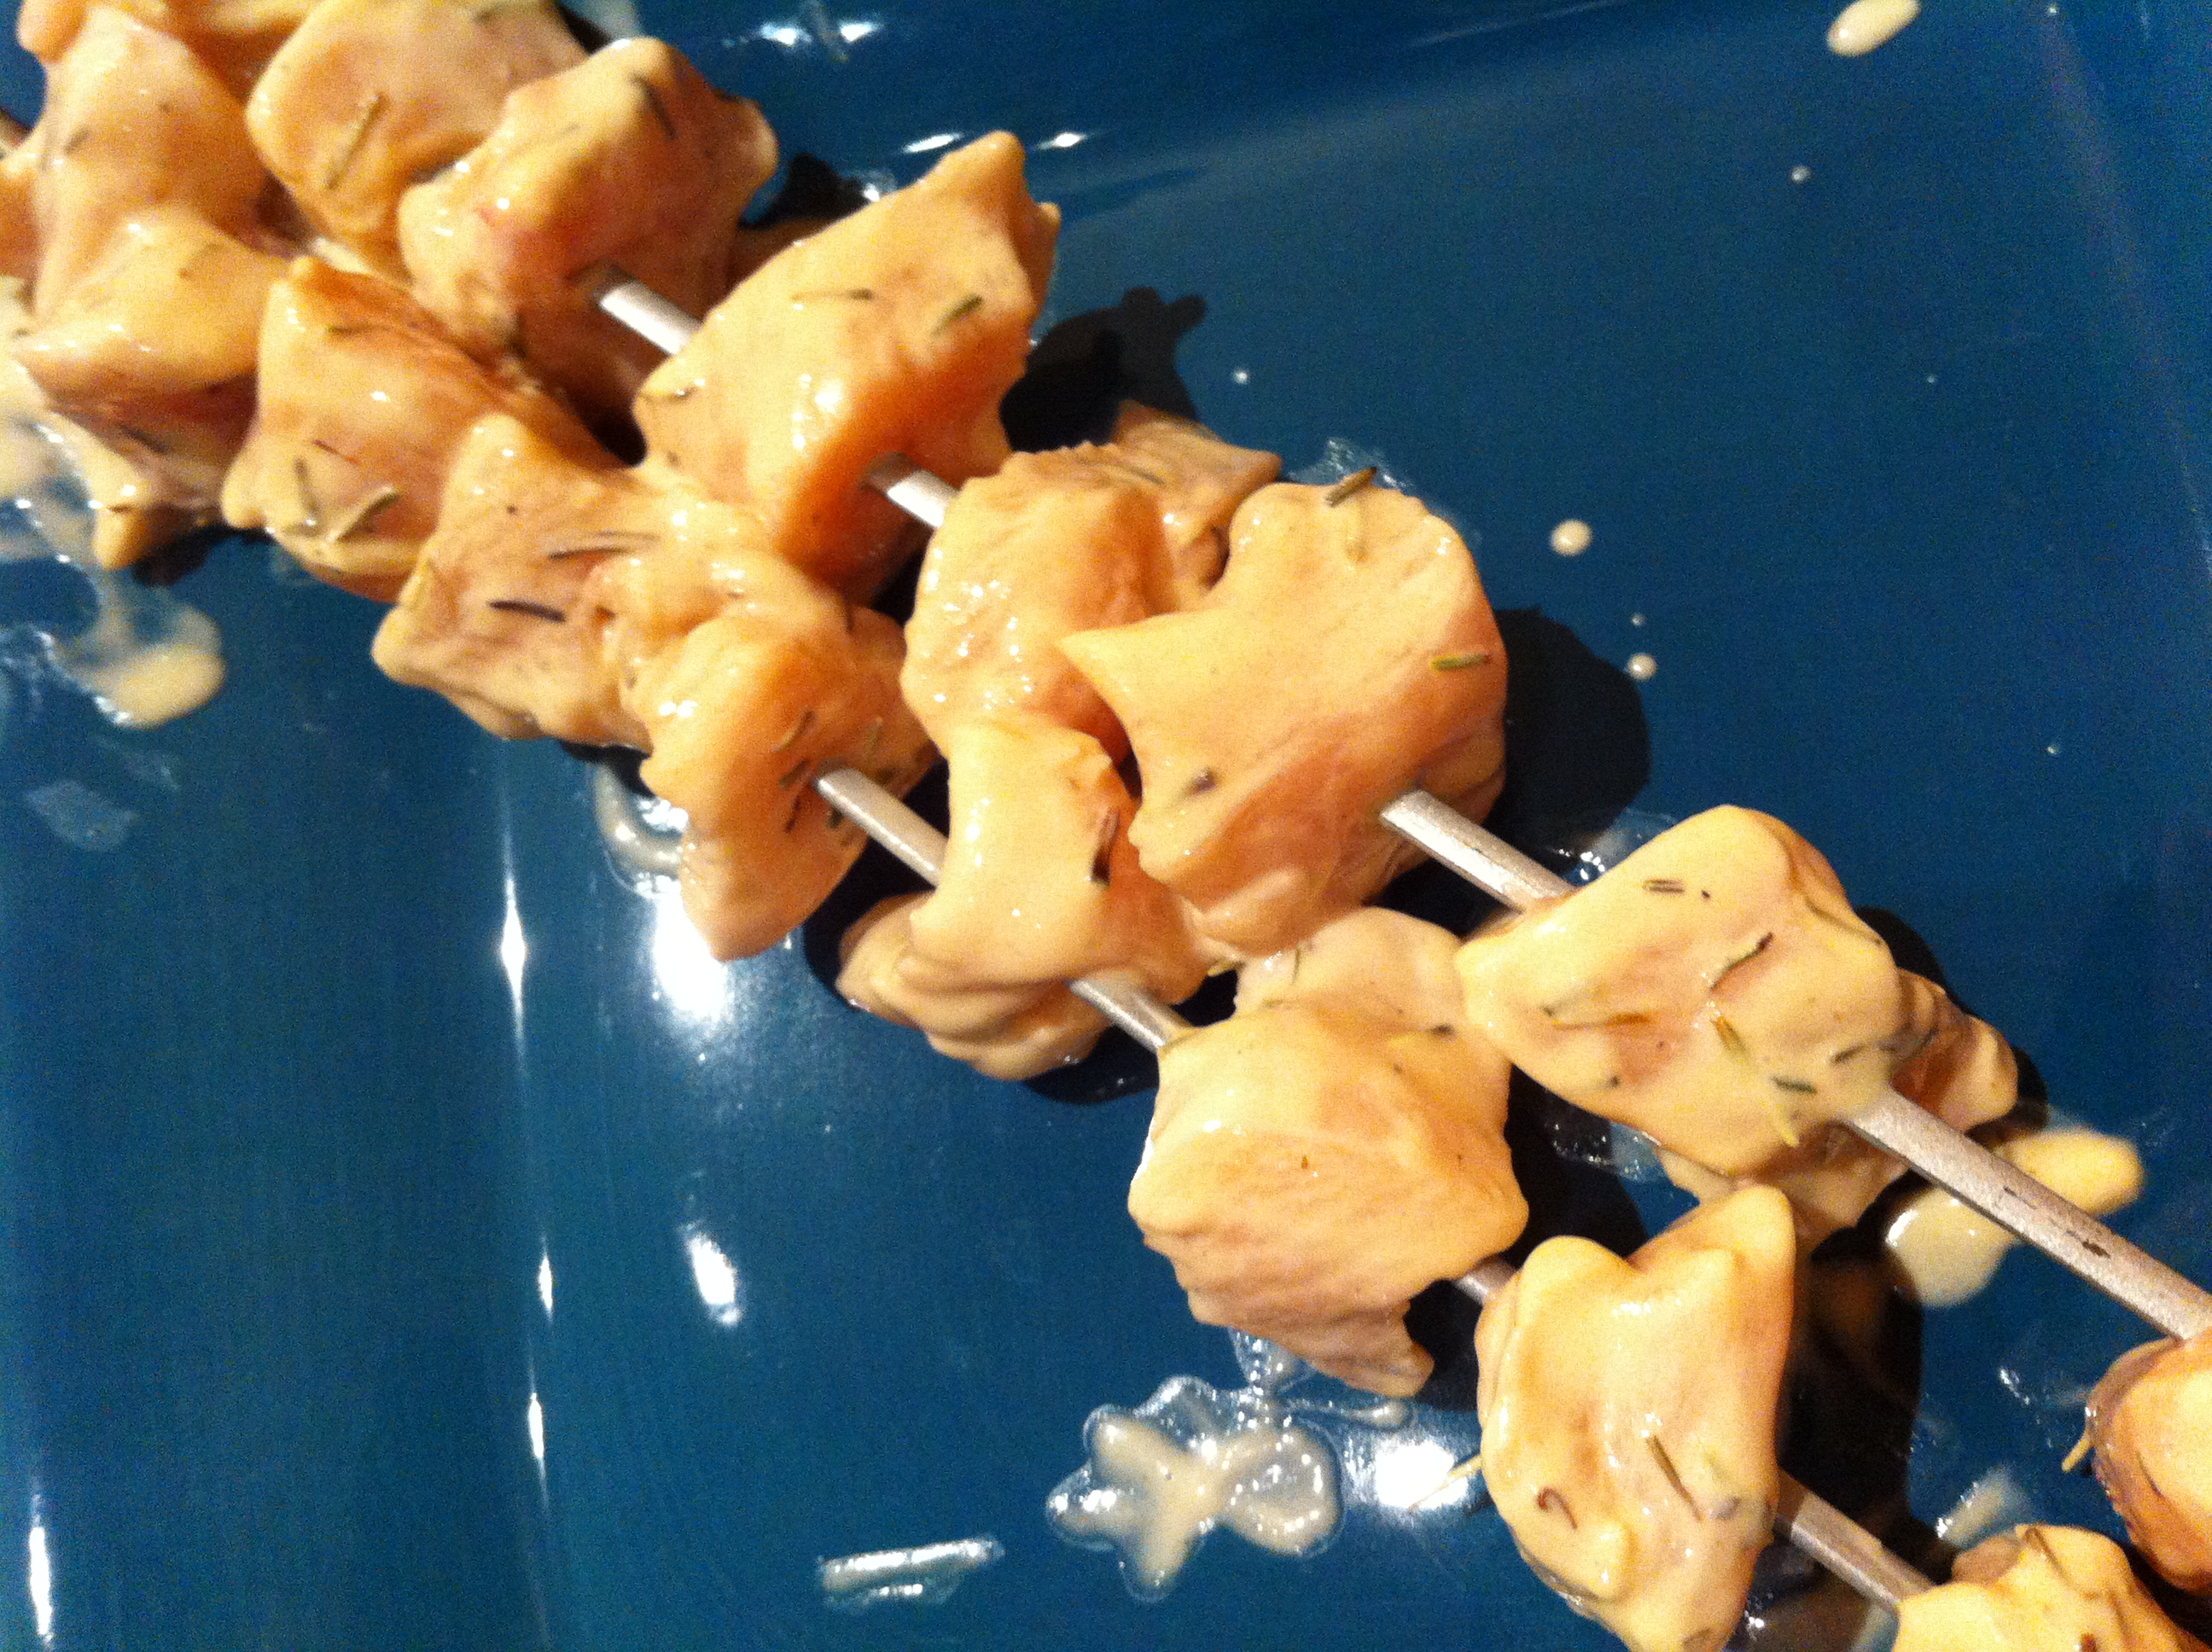
4. Preheat your grill to medium to medium-high heat.
While you’re waiting for your grill to heat up, thread the chicken onto skewers and discard the marinade. No reusing marinade that has touched raw meat!
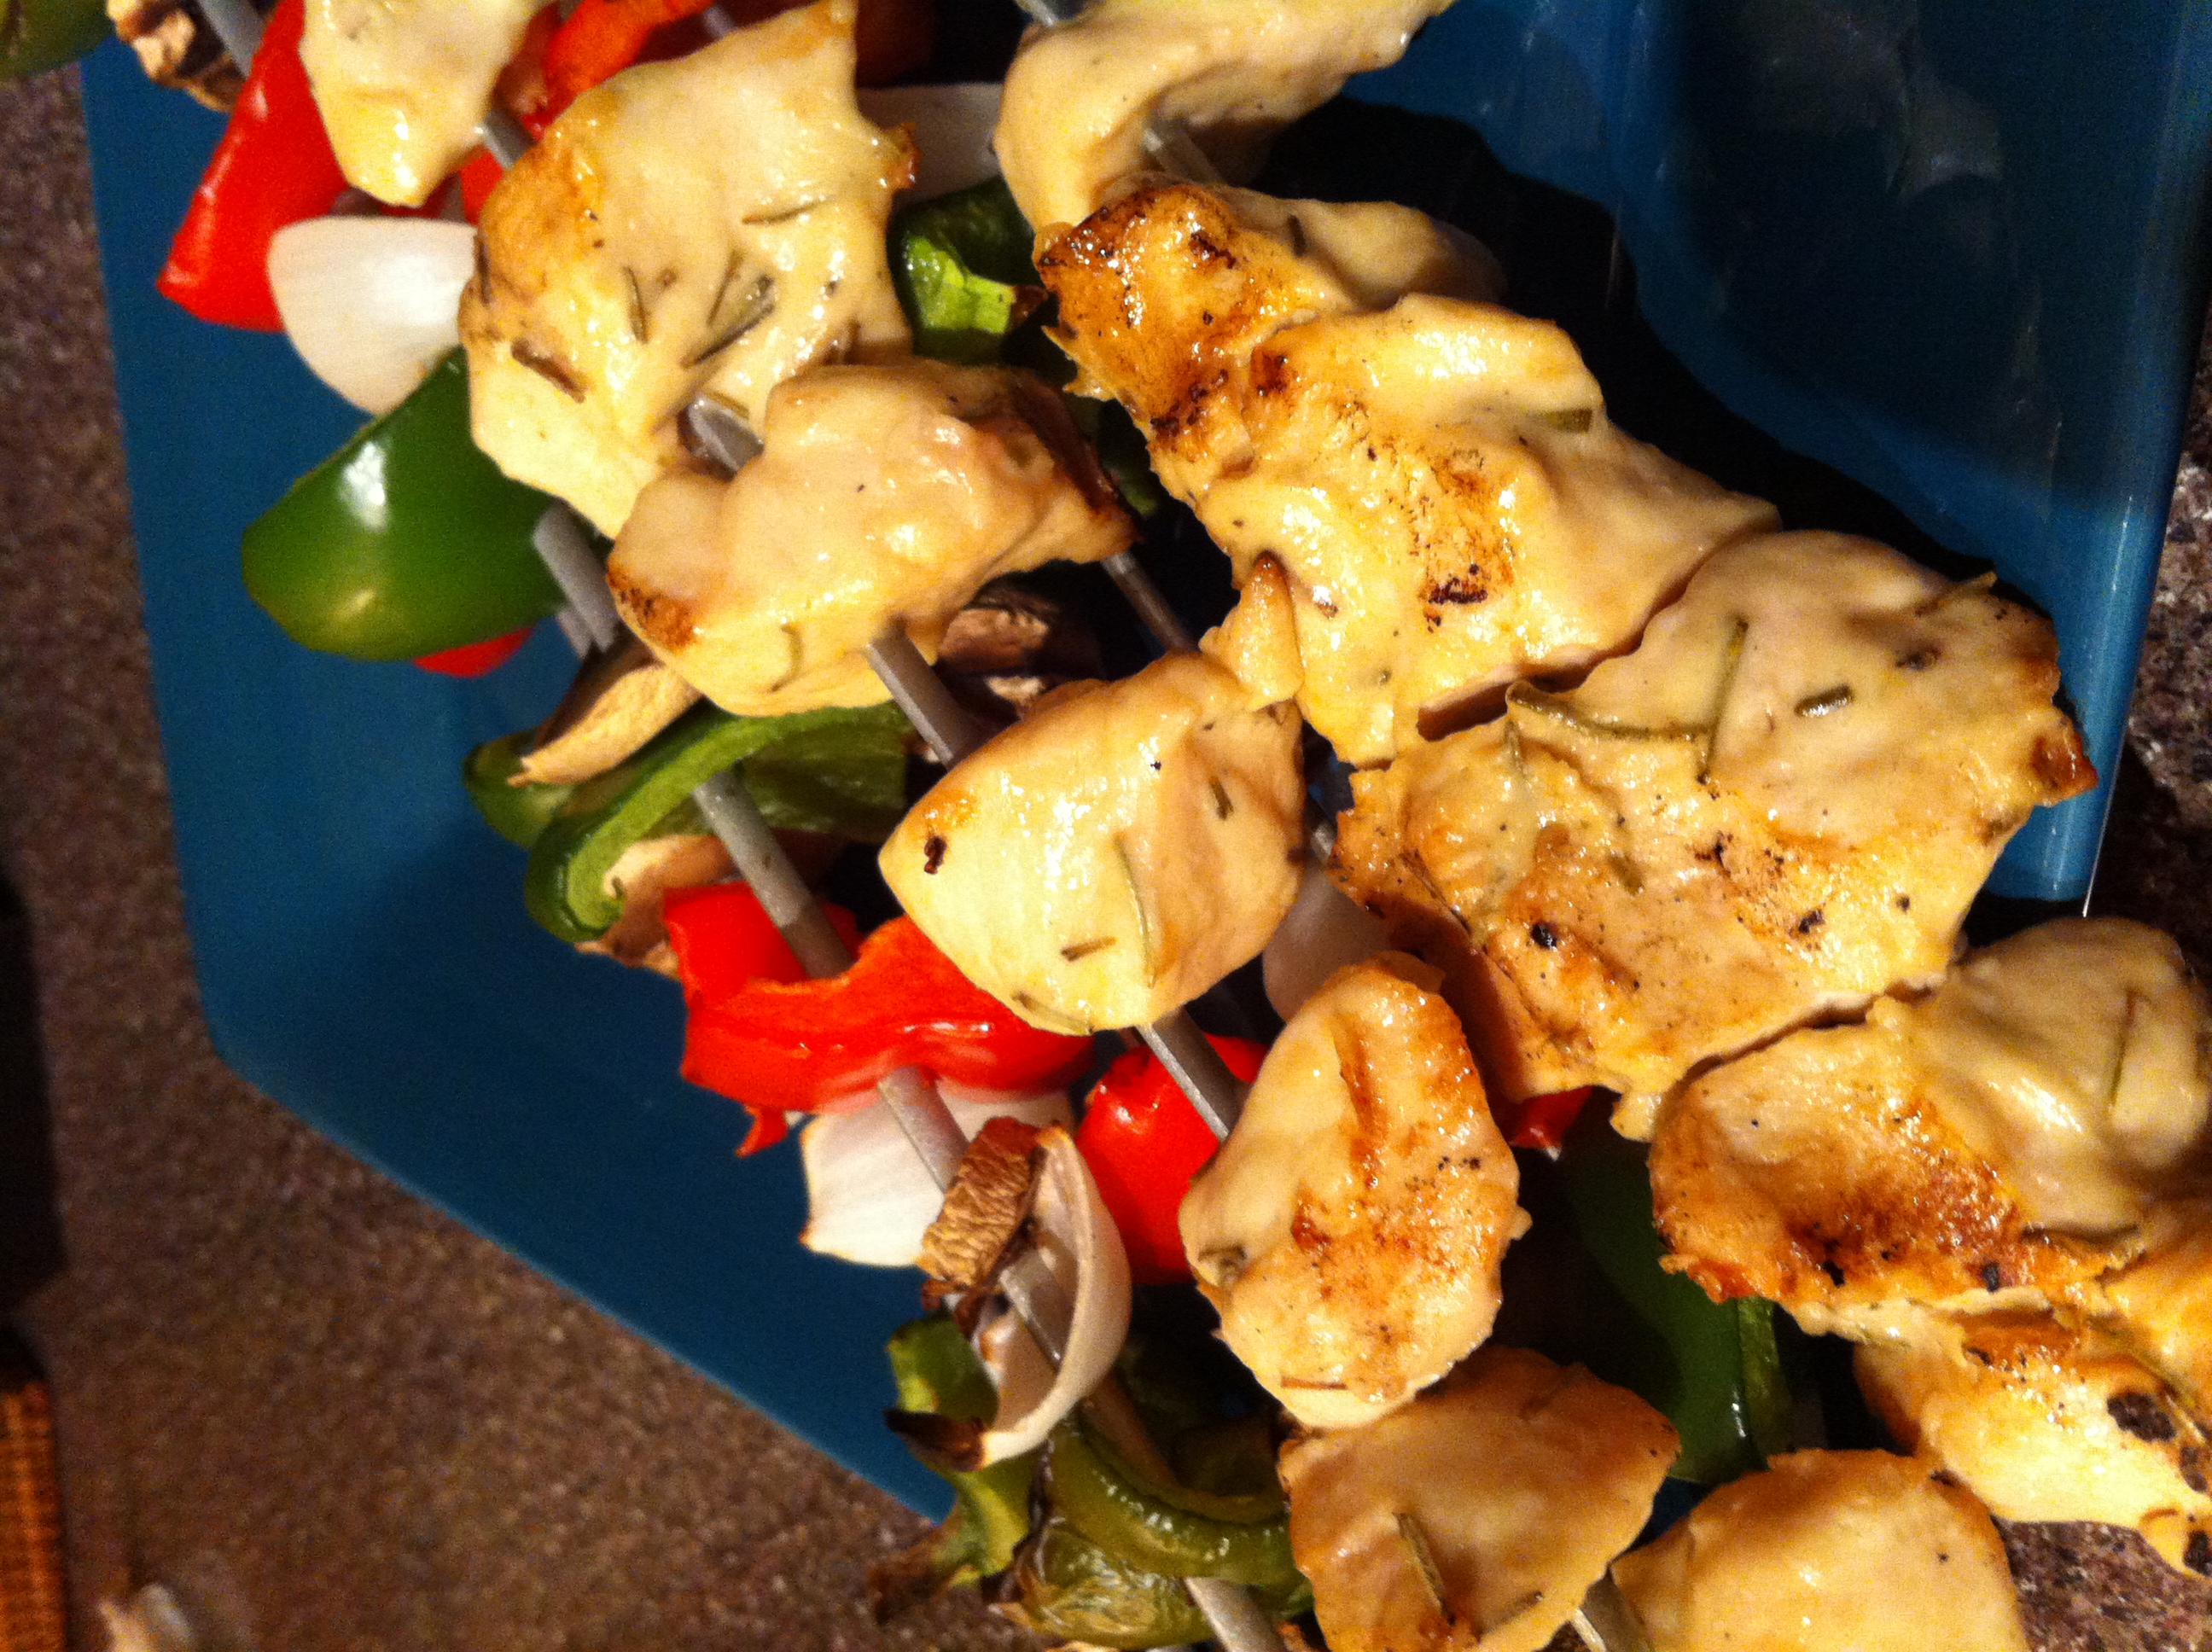
5. Time to grill!
Grill the skewers for about 8-12 minutes, until the chicken is no longer pink in the middle and the juices run clear (the usual disclaimer for cooking chicken)
We usually put the skewers of veggies on the grill at the same time as the chicken so they have enough time to cook.And while we’re waiting for the food on the grill, we’ll cook up some rice. The debate is usually what type of rice, white or brown, and it seems since Jason’s been cooking the rice recently we’re always eating white… hmm, I think we’ll have to change that.
Important Healthy Facts
(just the chicken and marinade, all veggies and side dishes are up to you!)
Serves: 4
Prep Time: 40+ minutes (10 minutes to prep the marinade and chicken, at least 30 minutes to marinade)
Cook Time: 8-12 minutes
Calories per serving: appx. 228 (that is if all the marinade was on the chicken while you cooked it)
Cold Brew Coffee- Cold and Hot New Trend
September 5, 2013
I’ll never forget the first time I tried coffee. I was probably in middle school, helping my mom at a volunteer event early in the morning. All the adults were drinking coffee and it smelled so good I asked my mom if I could try some. She laughed, told me I probably wouldn’t like it but helped me make a cup with plenty of milk and sugar anyway. She was right (as she usually is), I hated it. But, she said I’d probably learn to like it over time, eventually would be able to stop adding milk and sugar to cut down on the bitter taste, and she guessed I would be having some before work everyday.
Now, I wouldn’t say I’m addicted to coffee, but I do really enjoy it, and I don’t think there have been many days since entering the working world where I’ve gone without. We usually brew our own at home in the mornings, and over time I’ve slowly been upgrading the coffee makers. I started with a little 4 cup coffee maker, bought a grind and brew so I could have freshly ground beans, was given a Keurig (thanks Mom and Dad!), then Mom introduced me to the French Press and donated her espresso machine to the growing collection!
There are quite a few ways you could make coffee around the house depending on your mood! Now I keep seeing advertisements for cold brew coffee, and tried it for the first time when I was on vacation with my mom in Arizona. It was delicious! So smooth, not bitter and I could actually taste some of the flavors of the coffee.
Basically to make cold brew coffee you let your grounds soak in water for a long period of time, at least 12 hours, at room temperature. Then you filter out the grounds and are left with a coffee concentrate that you dilute, usually with water or milk. From what we’ve read, using hot water to brew coffee draws out oils and the bitter flavors from the coffee beans. But, using the room temperature or cold water produces a different reaction with the coffee beans, so no oil or bitter flavors. We decided the process sounded easy enough to try making it at home. Now you can buy special equipment to do this (like the Toddy for example), but we thought they were a little expensive when we could make our own set up at home.
Materials:
Coffee beans
Coffee grinder
Jug for “brewing”
Sieve
Coffee Filters
Bowl to collect the filtered coffee
Container to store the coffee
1. Grind the beans
I found a recipe from the NY Times to help make sure we got it right, and they suggest a coarse grind. You’ll need 1/3 c coarse ground beans for every 1 1/2 c of water. We used some beans from our new favorite coffee shop, Beans and Leaves in Long Grove, IL. If you’re in the area, you need to stop. It’s a small little shop but they have some amazing flavored whole bean coffee at really reasonable prices. We’re planning on calling an order in and having them ship us some of our favorite blends.

- Beans and Leaves Almond Amaretto Blend, yum!

2. Combine beans and water
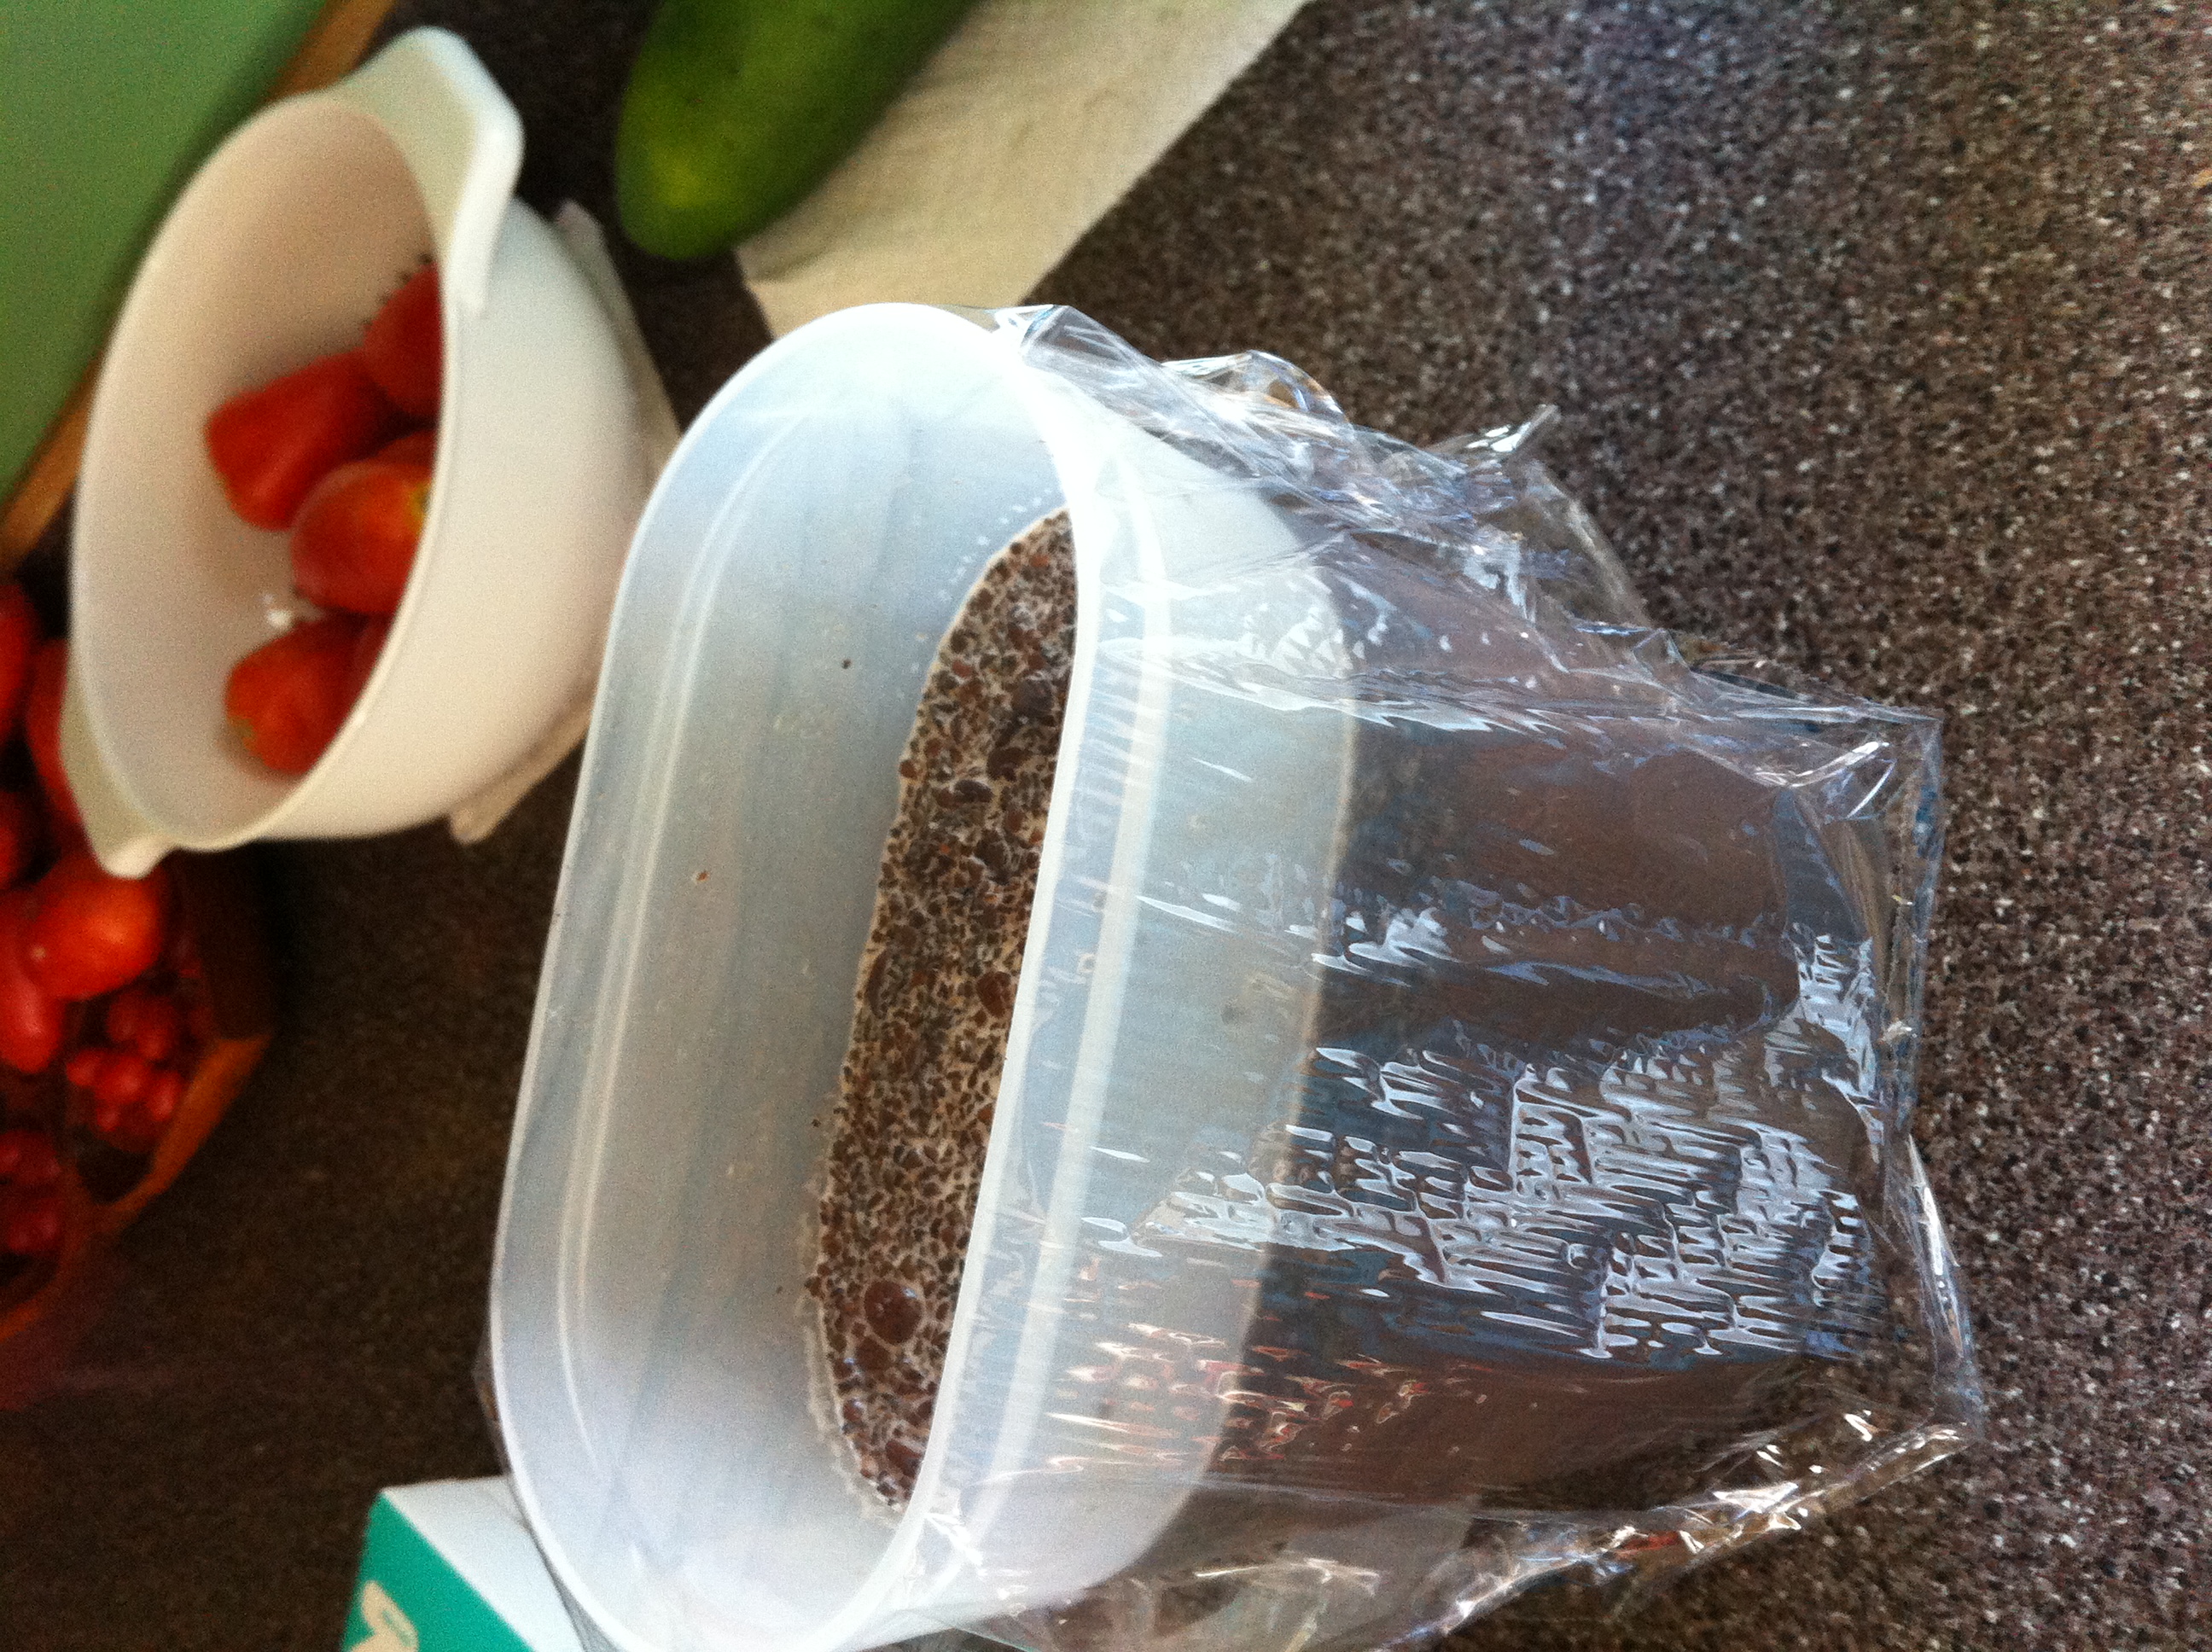
1/3c of ground beans for every 1 1/2 c of water. Stir so everything is mixed in well. Any dry patches of grounds are wasted coffee, so make sure you mix it well. We like to make big batches (six cups at a time) so we can drink it all week.
3. Cover the container and let it sit
We let it sit covered on the counter for at least 12 hours. 24 hours is the recommended amount but you can get away with 12 in a pinch.
- Letting the coffee brew
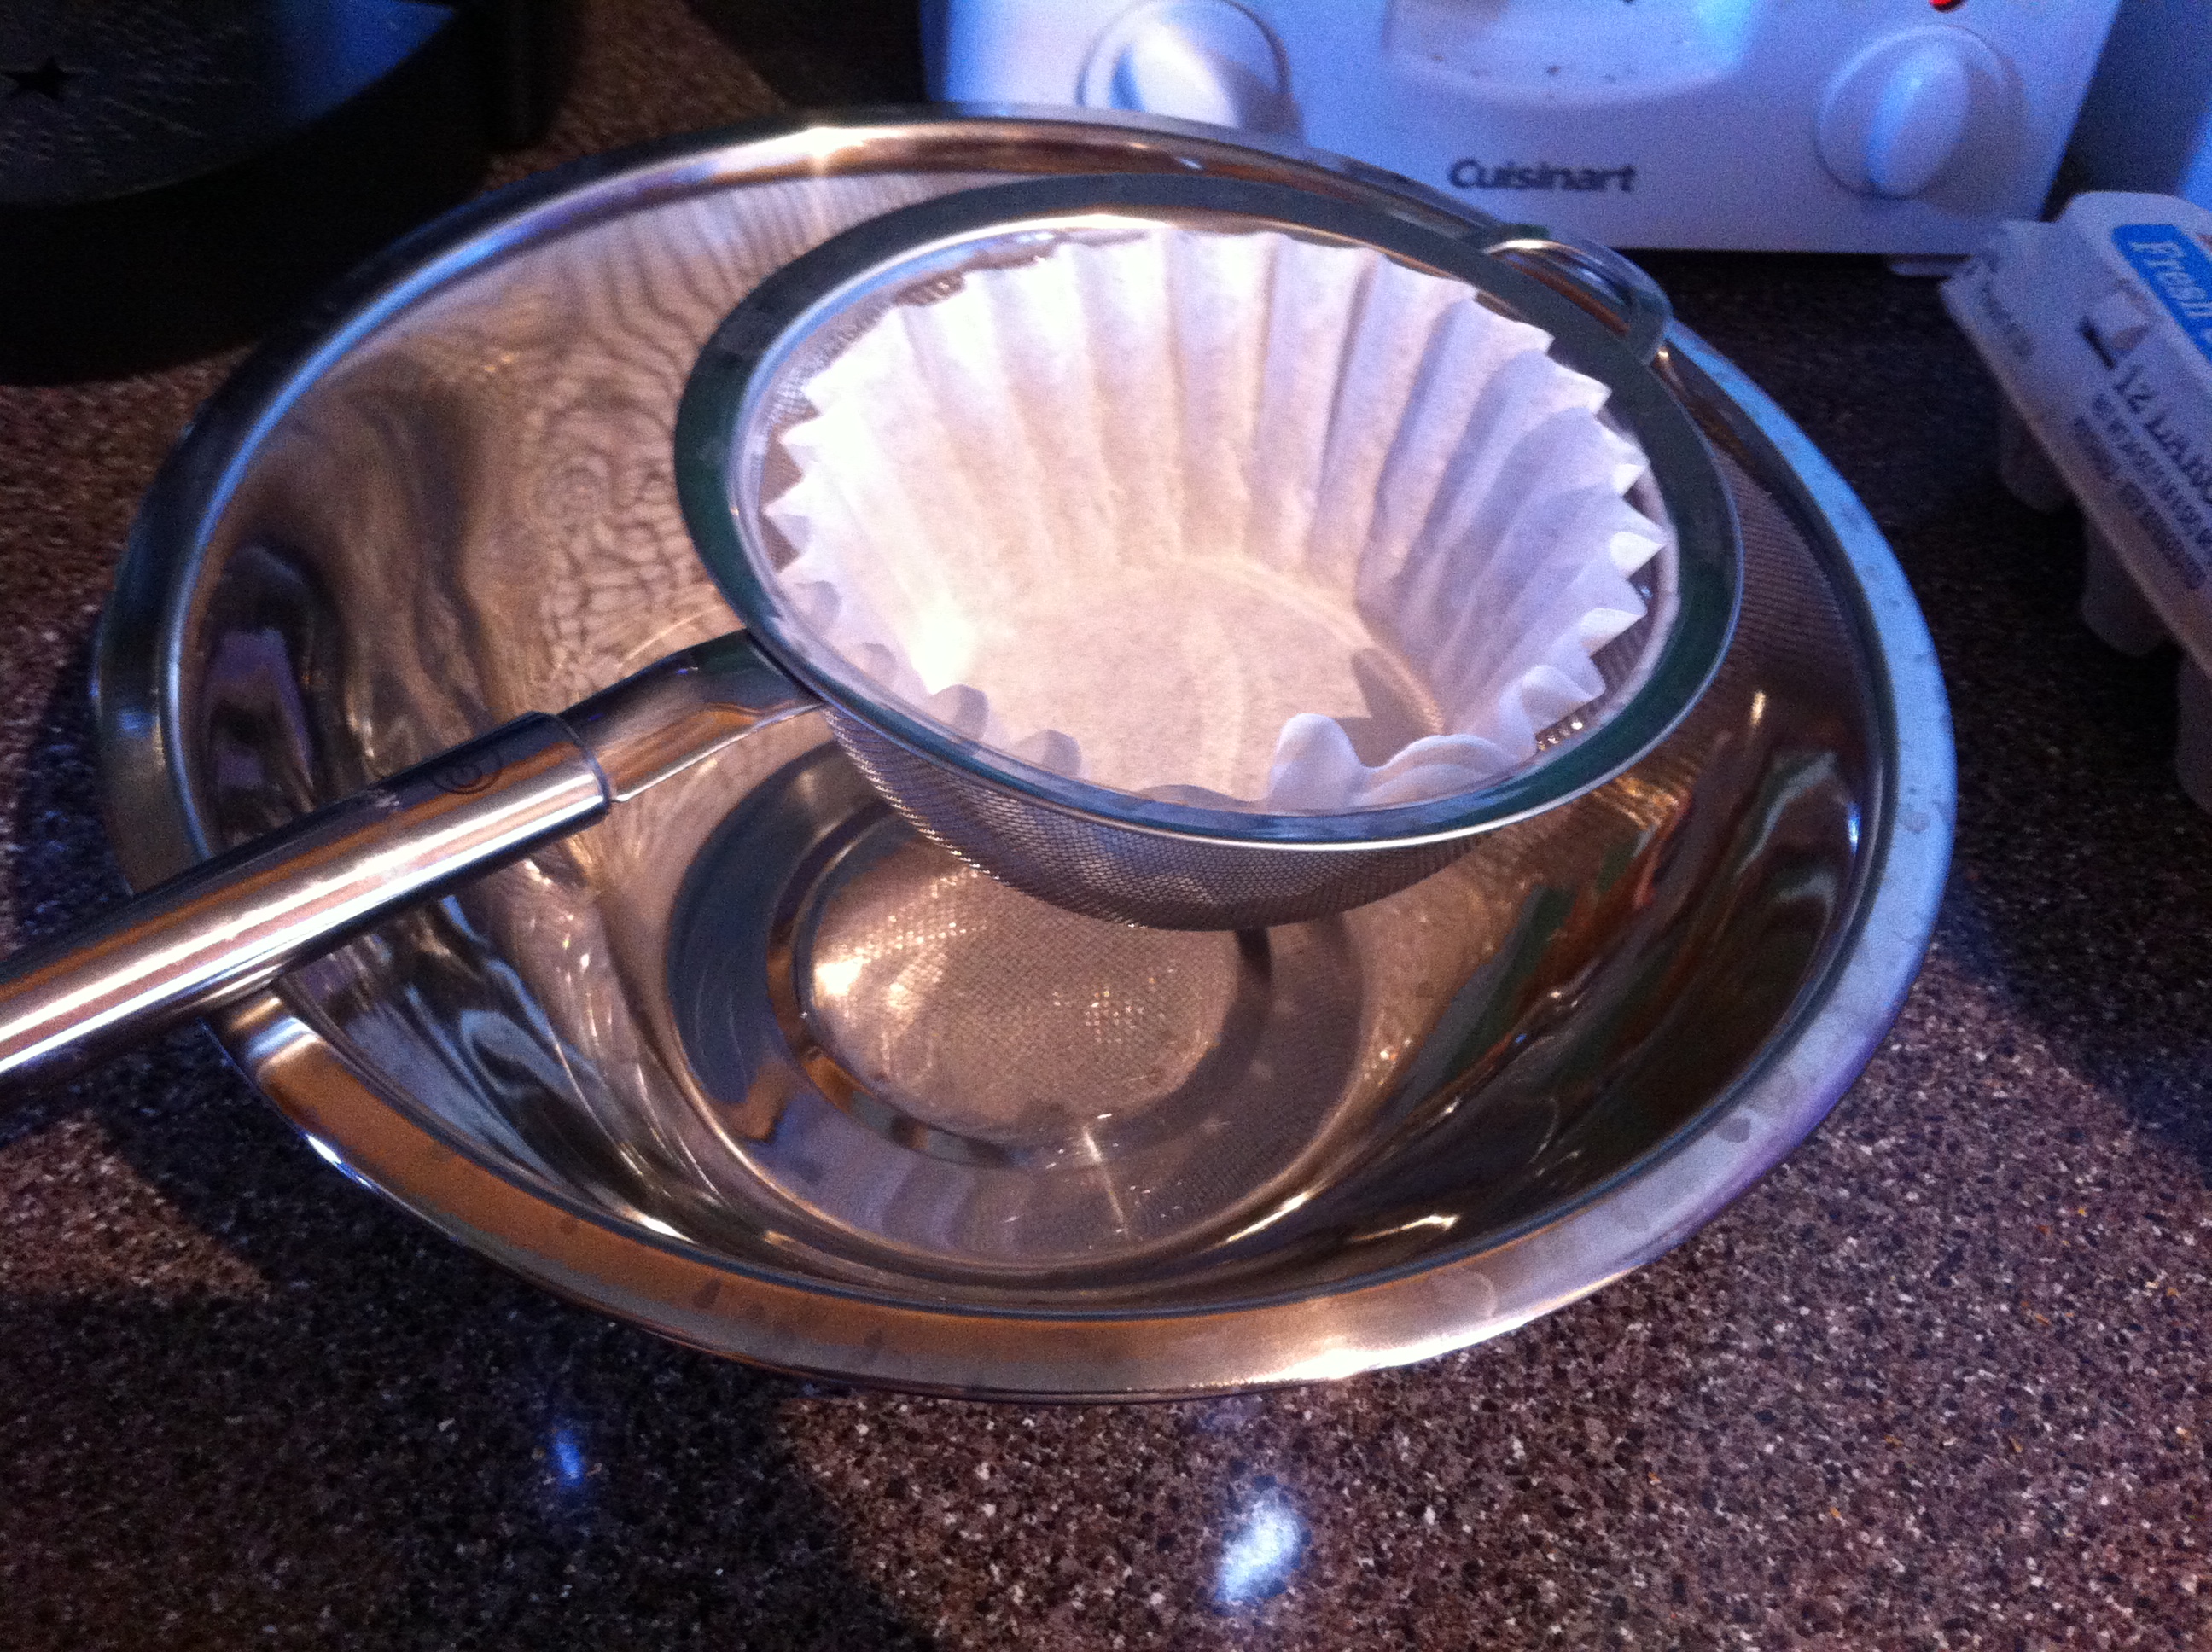
4. Strain the coffee
We put a coffee filter in a sieve over a large metal bowl to help collect the coffee more easily. Then we transfer it to a smaller container for storage in the fridge. It seemed easier than putting the sieve over a funnel into our smaller container. Someone would have had to stand there holding the sieve waiting for the coffee to strain. With the metal bowl we can simply pour the coffee into the sieve and walk away. This step can take some time as you wait for the coffee to filter through the grounds.

- Strainer with the coffee filter
5. Enjoy!
Since the cold brew process makes stronger coffee, or coffee concentrate, use a 1:1 ratio to mix your cold press with water or milk. When it was really hot last week, we were using milk and pouring the coffee over ice, it made a delicious iced coffee! Not diluted down at all like it was when we just poured hot coffee over ice. Now that it’s a little cooler in the morning, I’ve been mixing mine with hot water and it still tastes great. I love being able to taste all the flavors, especially the little amaretto taste of this batch!
We’ll have to go out and buy some flavored syrups now. I’d love to try adding some caramel on those days I’m craving something sweet! Has anyone else given cold brew a try yet?
Mmmm Ribs!
August 30, 2013
There’s something about all the summer holidays that makes me want to grill, mix up some potato salad and buy local sweet corn from the farm up the street. And of course it’s around the same time that the grocery stores put racks of baby back ribs on sale! With Labor day coming up, I picked up a rack to enjoy on the “unofficial last day of summer.”
Honestly, I was legitimately scared to cook ribs at home for a long time. It seemed like too much work, and I was nervous about over cooking them to the point where they would end up being dry. I was flipping channels a few years ago and Bobby Flay was on the Food Network (a frequently watched channel at our house in case you hadn’t figured that out yet) talking about cooking ribs on the grill. Now I get that he is skilled at grilling everything under the sun, but he made it sound easy enough that I had to give it a try! The first time around was a success, so I invited some people over for a second try. There are a few people (Jason included) that get excited when they hear I’m cooking ribs!
I modified Bobby’s rib rub recipe (I’m a little bit of a wimp when it comes to hot spices), prepped the ribs and after about 2 hours on the grill, dinner was served! Here’s the step by step:
1. Mix the dry rib rub together in a separate bowl
1 T cumin
1 T paprika
1 T garlic powder
1 T onion powder
1 T chili powder
1 T brown sugar
1 T sea salt
1/2 t cayenne pepper
1/2 t black pepper
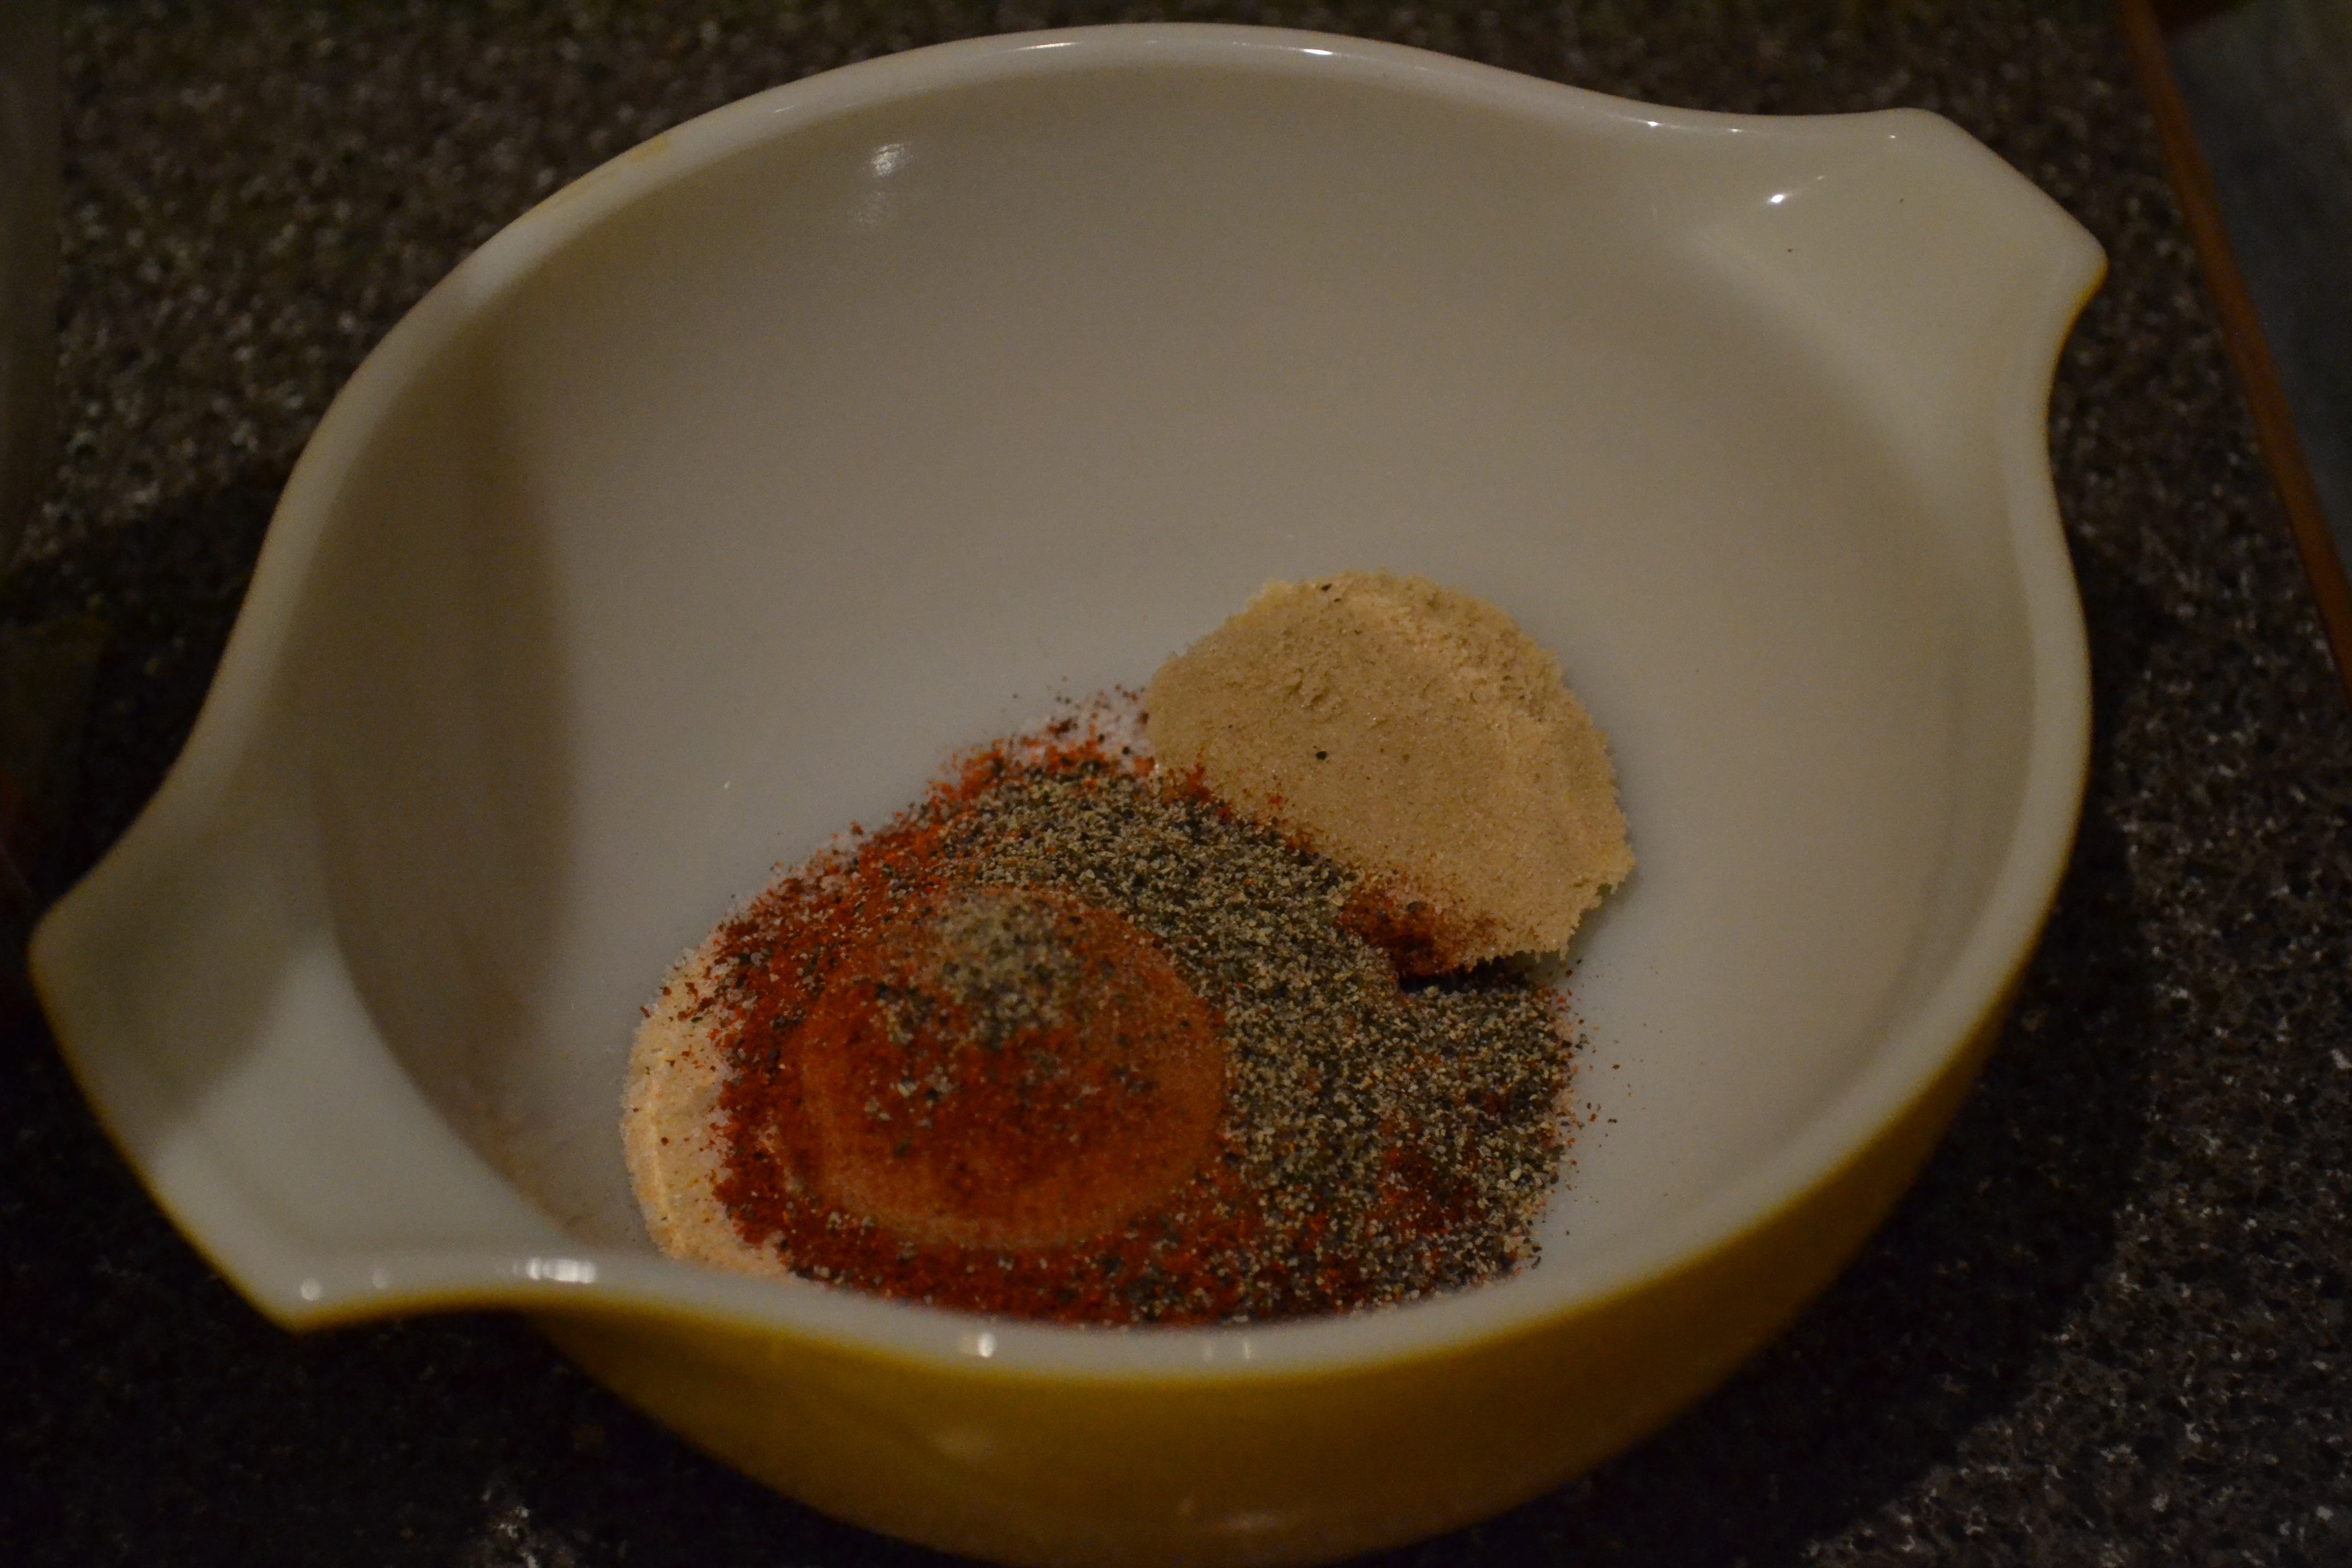
Mixing together the spices
Don’t put the brown sugar away yet! You’ll need about an additional 1/4- 1/2 c when it comes time to season the ribs
2. Prep the ribs
After I take them out of the package I lay them on a cutting board covered in paper towels and pat them dry. There is a membrane on the back of the ribs that needs to come off. I’ve heard if you leave it on, the ribs come out tougher and prevent the rub from really getting into all of the meat. To do this, you can take a finger or a butter knife, and slide it under the membrane/over a bone. Lift the membrane until it starts to tear (it’s a pretty audible noise.) Use a paper towel, grab the membrane and slowly pull across the rack of ribs until it comes off. You might be able to get it all in one piece, or it might take a few tries, but just be patient with it, you’ll eventually be able to remove it all.
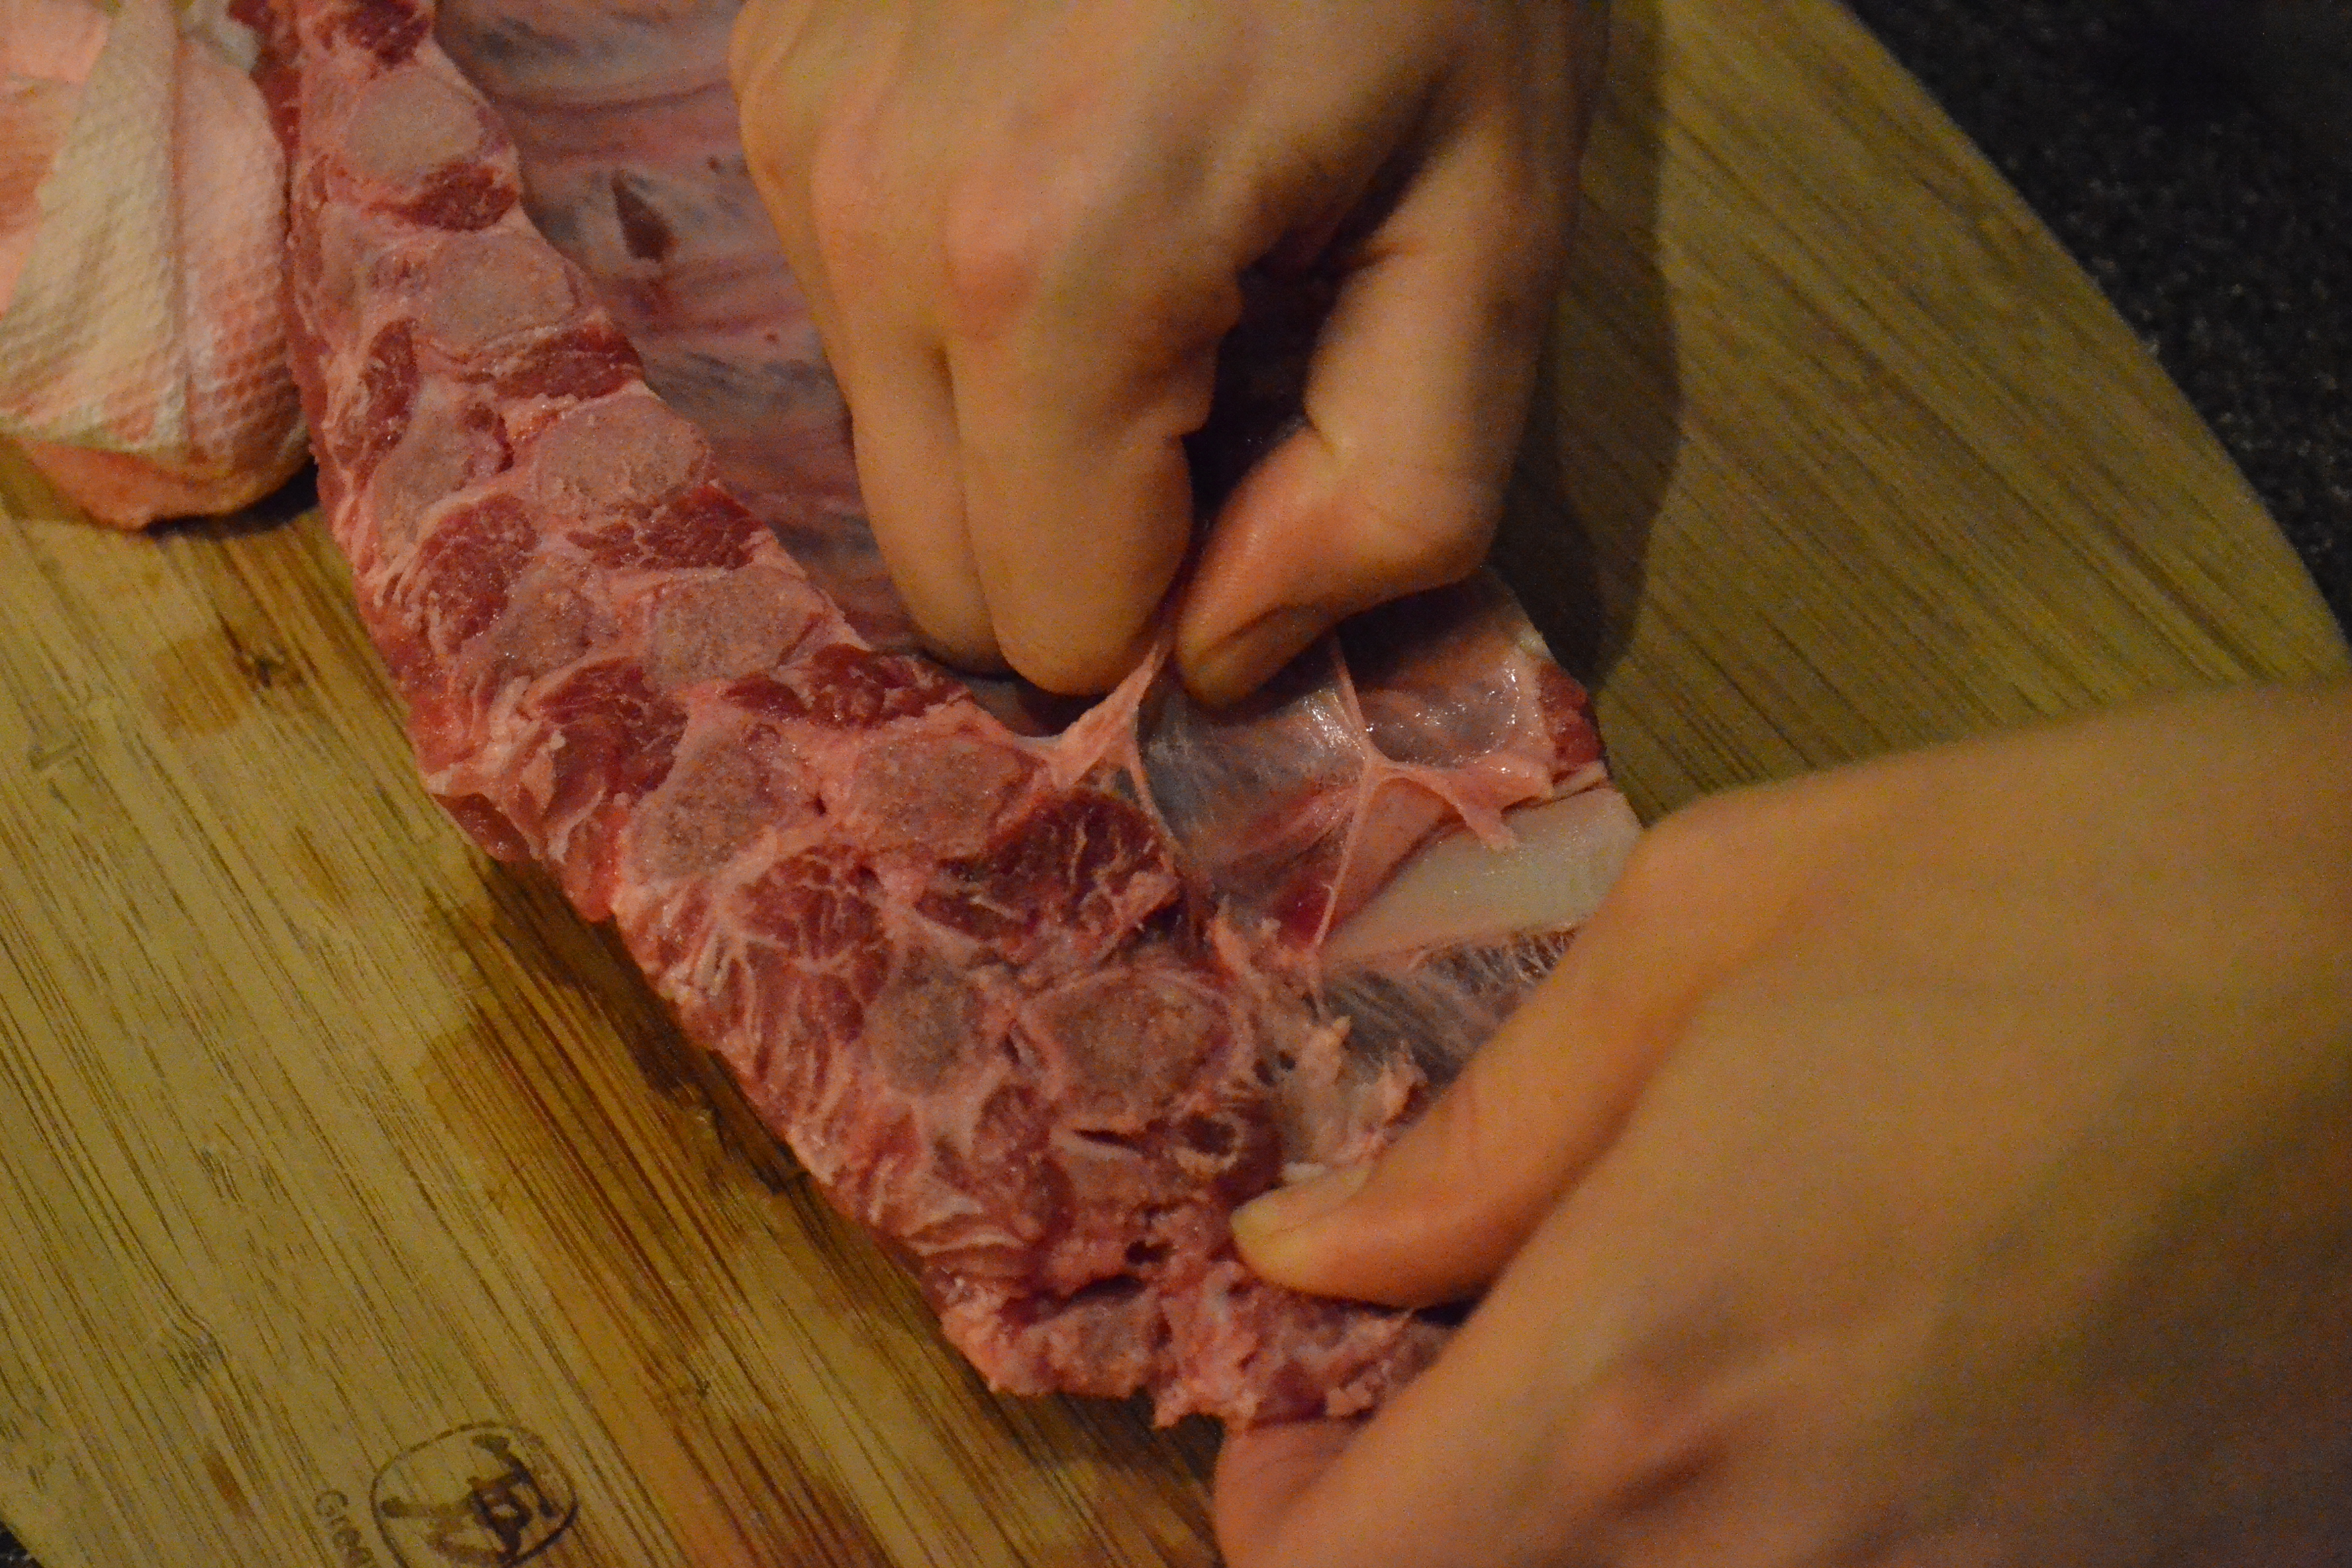
Starting to remove the membrane
3. Season the ribs
The dry rub will cover about 2 1/2 to 3 lbs of ribs. I start with the back (bony side), pour about half of the rub across the rack, then rub and pat it in until it covers the back and sides of the ribs. Flip it over, and repeat on the front (meaty side). To help balance the heat and keep the ribs moist, I pour anywhere from an additional 1/4 to 1/2 c of brown sugar onto the front of the ribs and pat this in so it covers the ribs evenly. You don’t have to do this if you’re trying to watch your calories or sugar though (1/2 c of packed brown sugar is about 415 calories!)
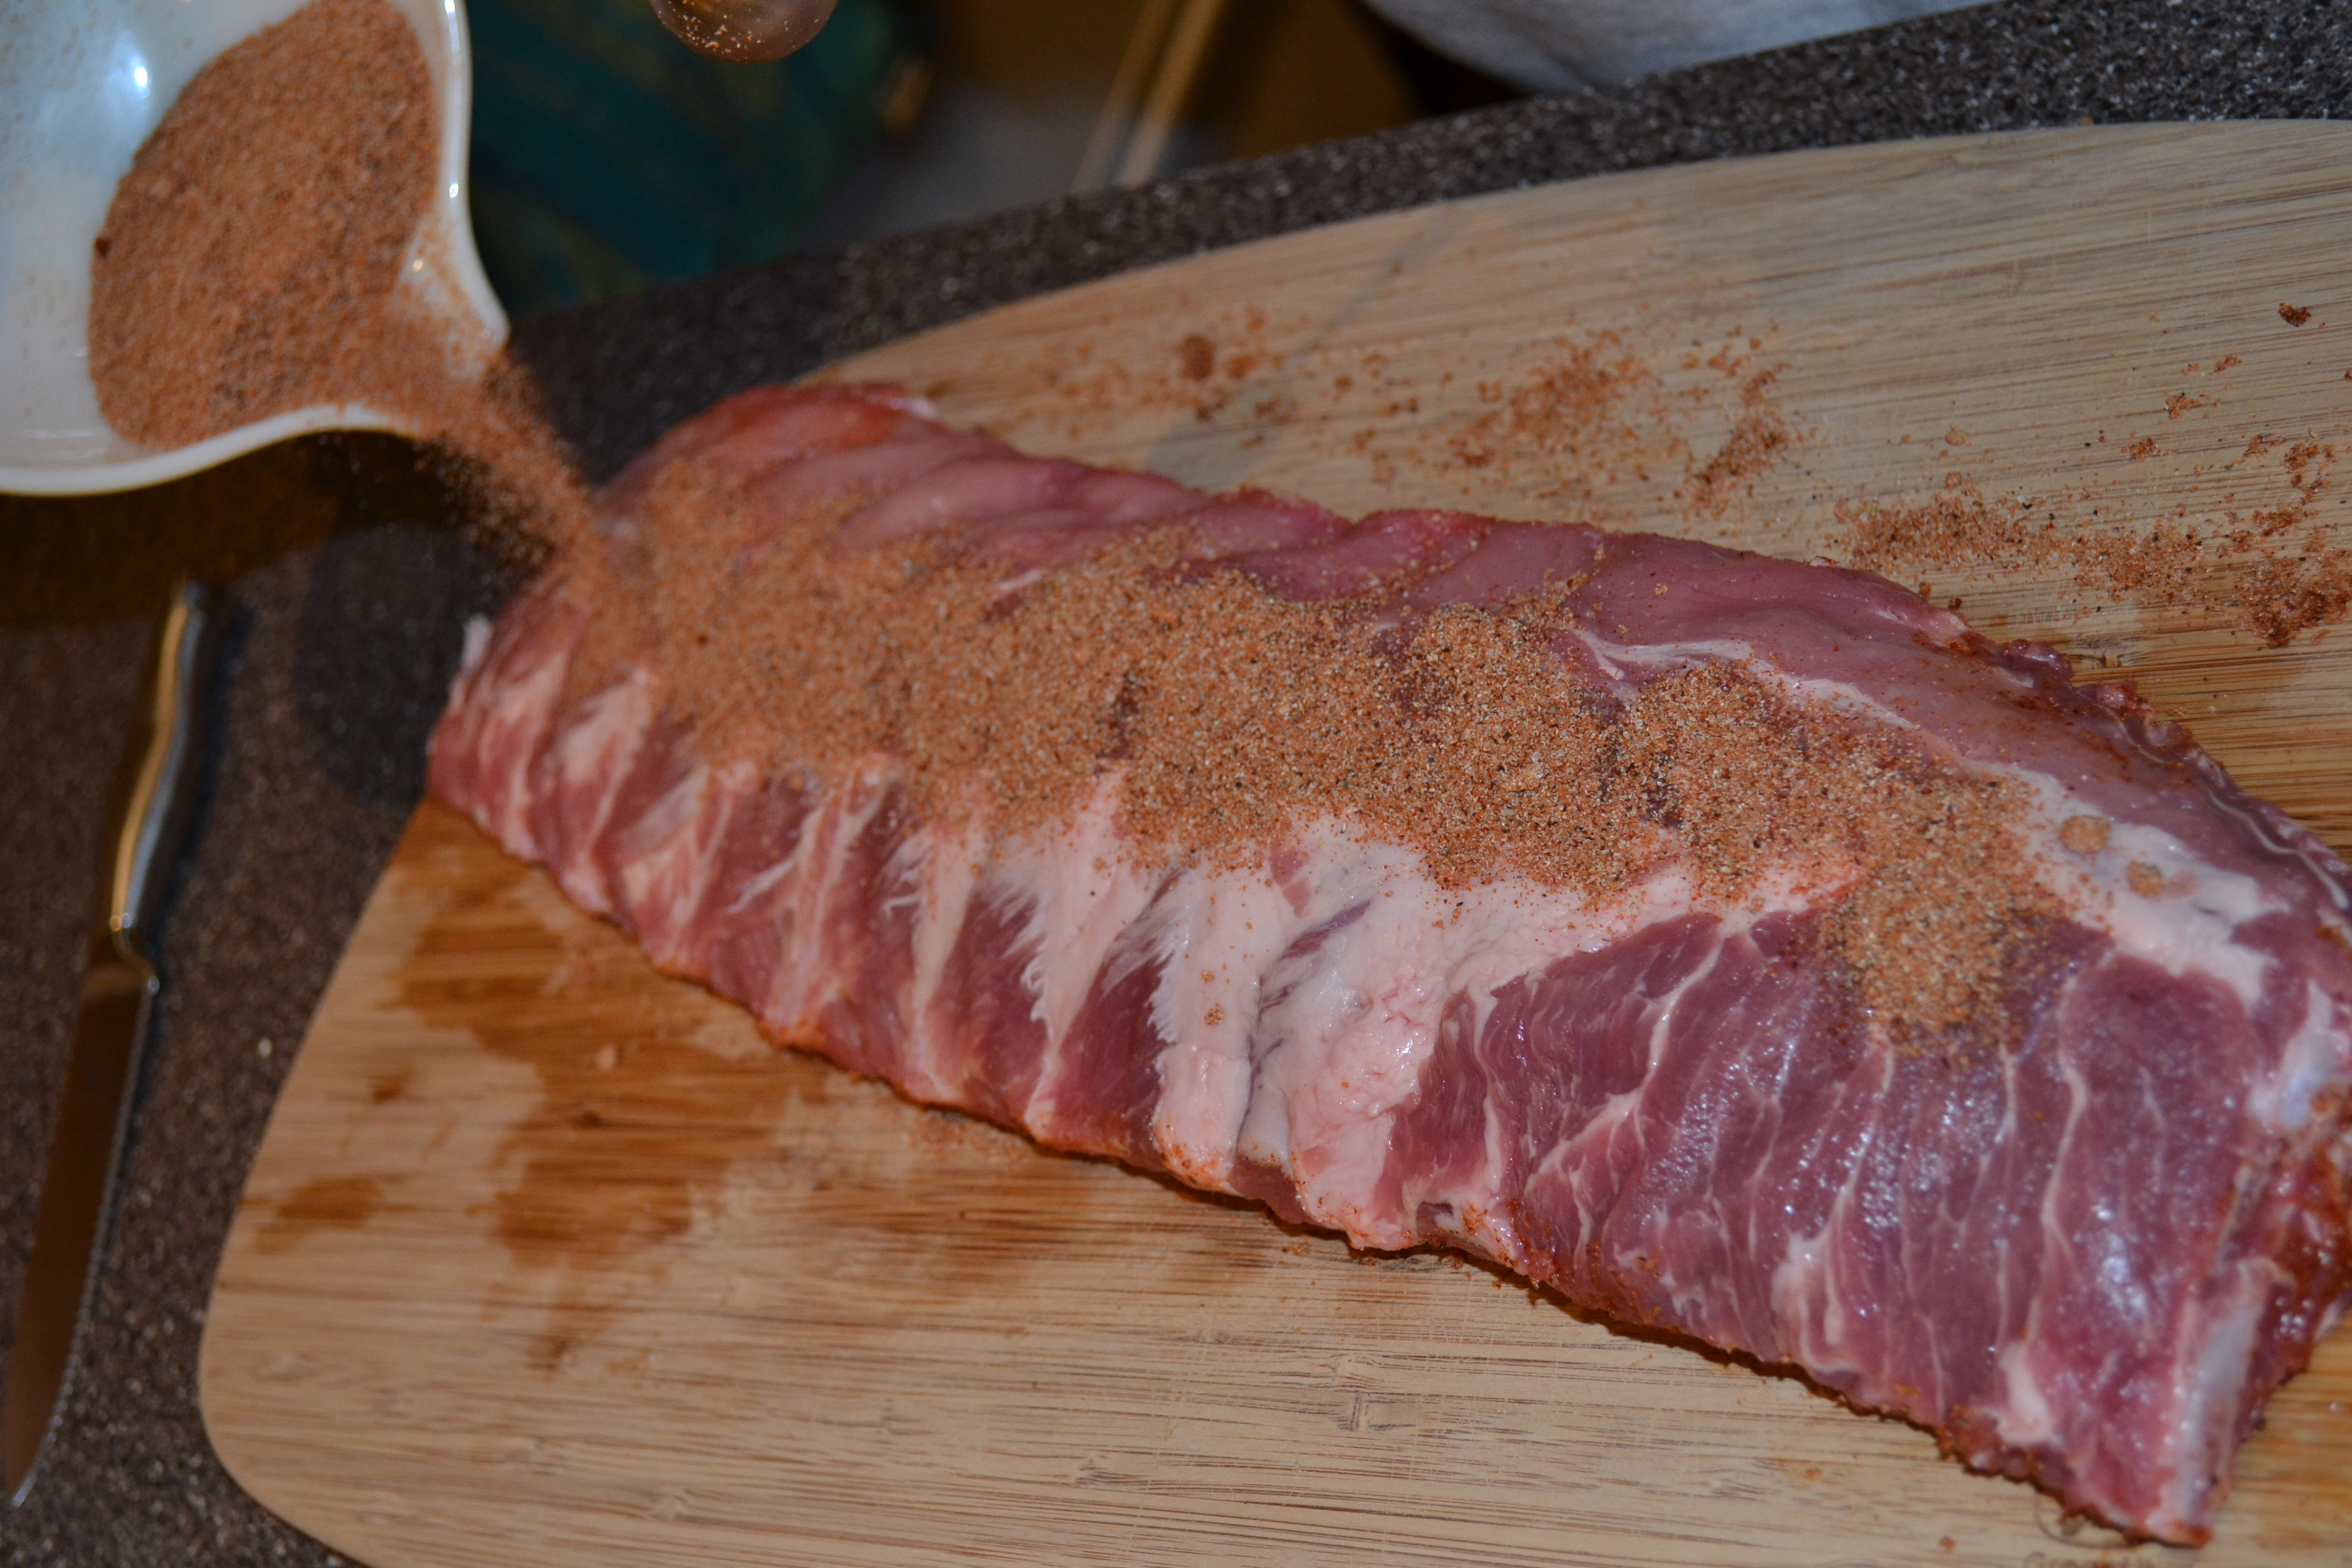
Rubbing the spices into the ribs
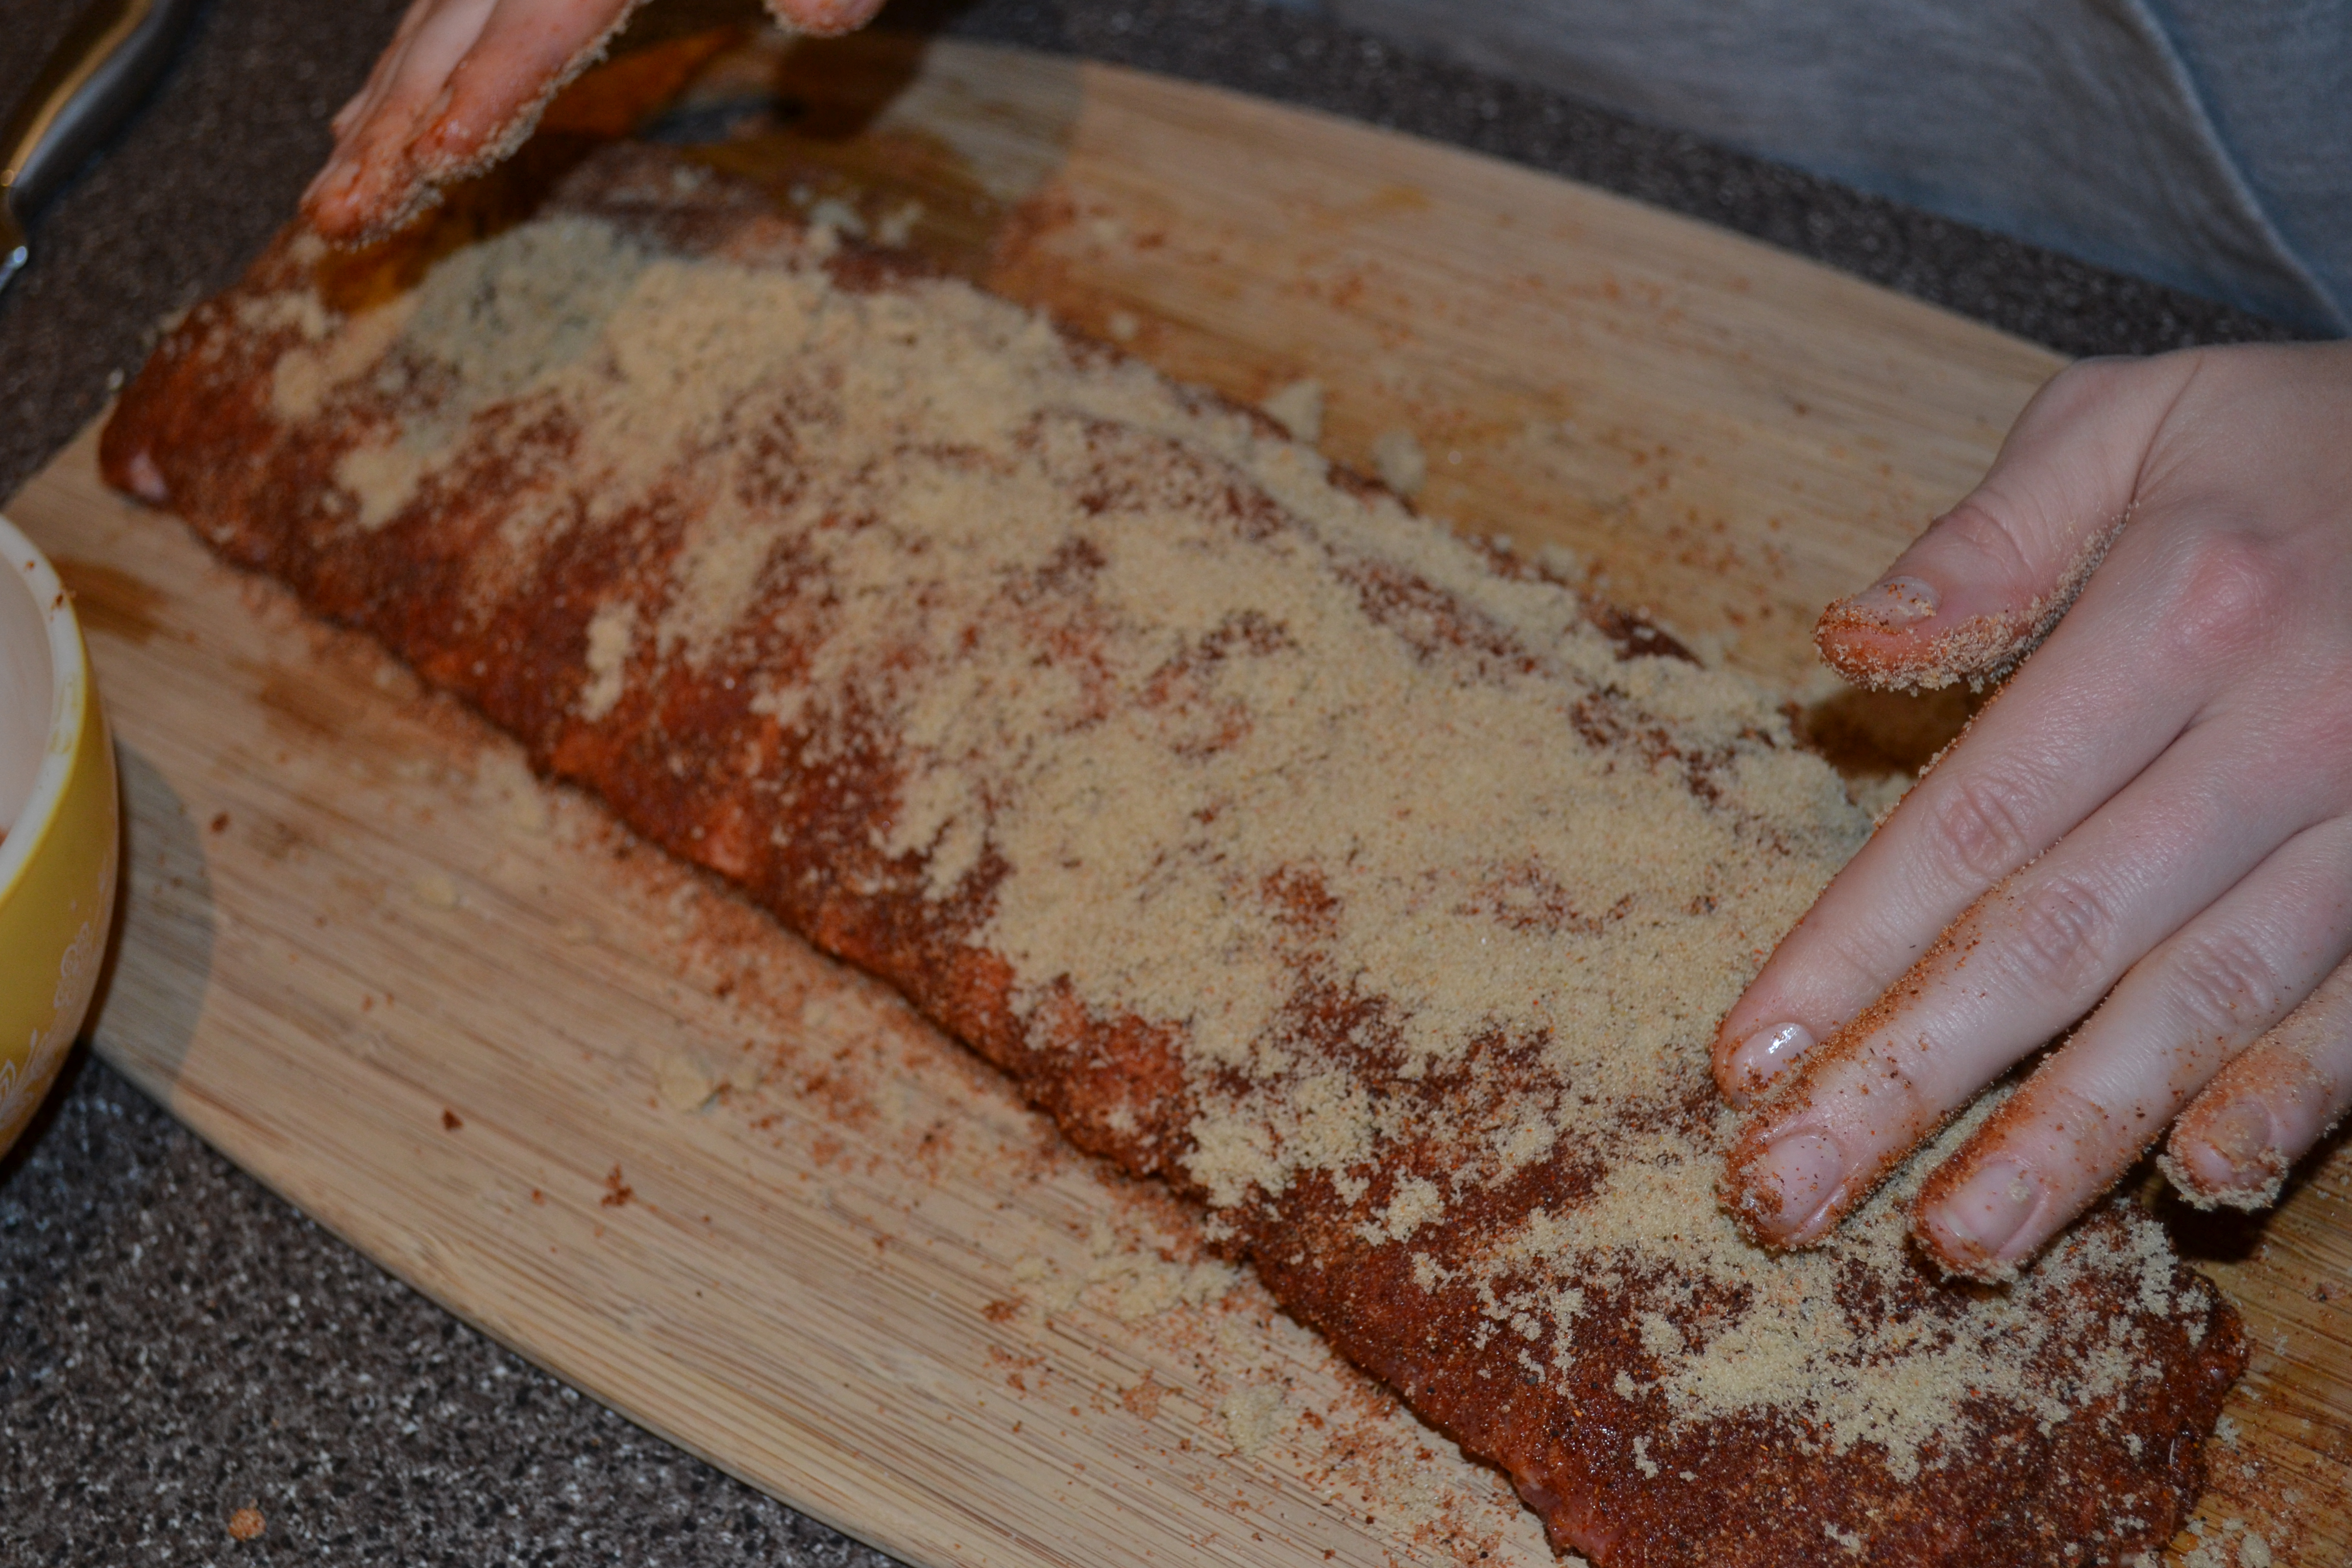
Adding the brown sugar to the top of the spices
4. Wrap the ribs in tin foil and let them sit
This helps the seasoning really get into the meat. I leave mine in the fridge for at least 2 hours. When it’s almost time to start cooking them, I let them rest on the counter for about 30 minutes to an hour so they come up to room temperature.
5. Pre-heat the grill
I always cook the ribs at 250°F over indirect heat. (I accidentally cooked them over direct heat once, they were fine, just not as tender as I like) We have a gas grill so it makes keeping an eye on the temperature very easy!
6. Cooking time!
I’ve learned that it usually does not take as much time to cook the ribs as the package recommends. The USDA recommends that you cook pork to an internal temp of 160°F, so I absolutely make sure I get the meat up to temperature! But on average, my 2 1/2lb rack of ribs takes about 2 hours to cook.
Every 30 minutes I flip the ribs over to the other side for even cooking. When I get to the 1:50 minute mark, I go check the temp of the ribs and if we’re close to 160°F, I’ll baste the top of the ribs with bar-b-que sauce and let it cook for the last 10 minutes, or until it’s up to temperature.
7. Let the ribs rest
After they are done, I have to exercise a lot of patience to cover the ribs in tin foil and let them rest for about 15 minutes. In reality, it helps us set the table and make sure everything else is done.
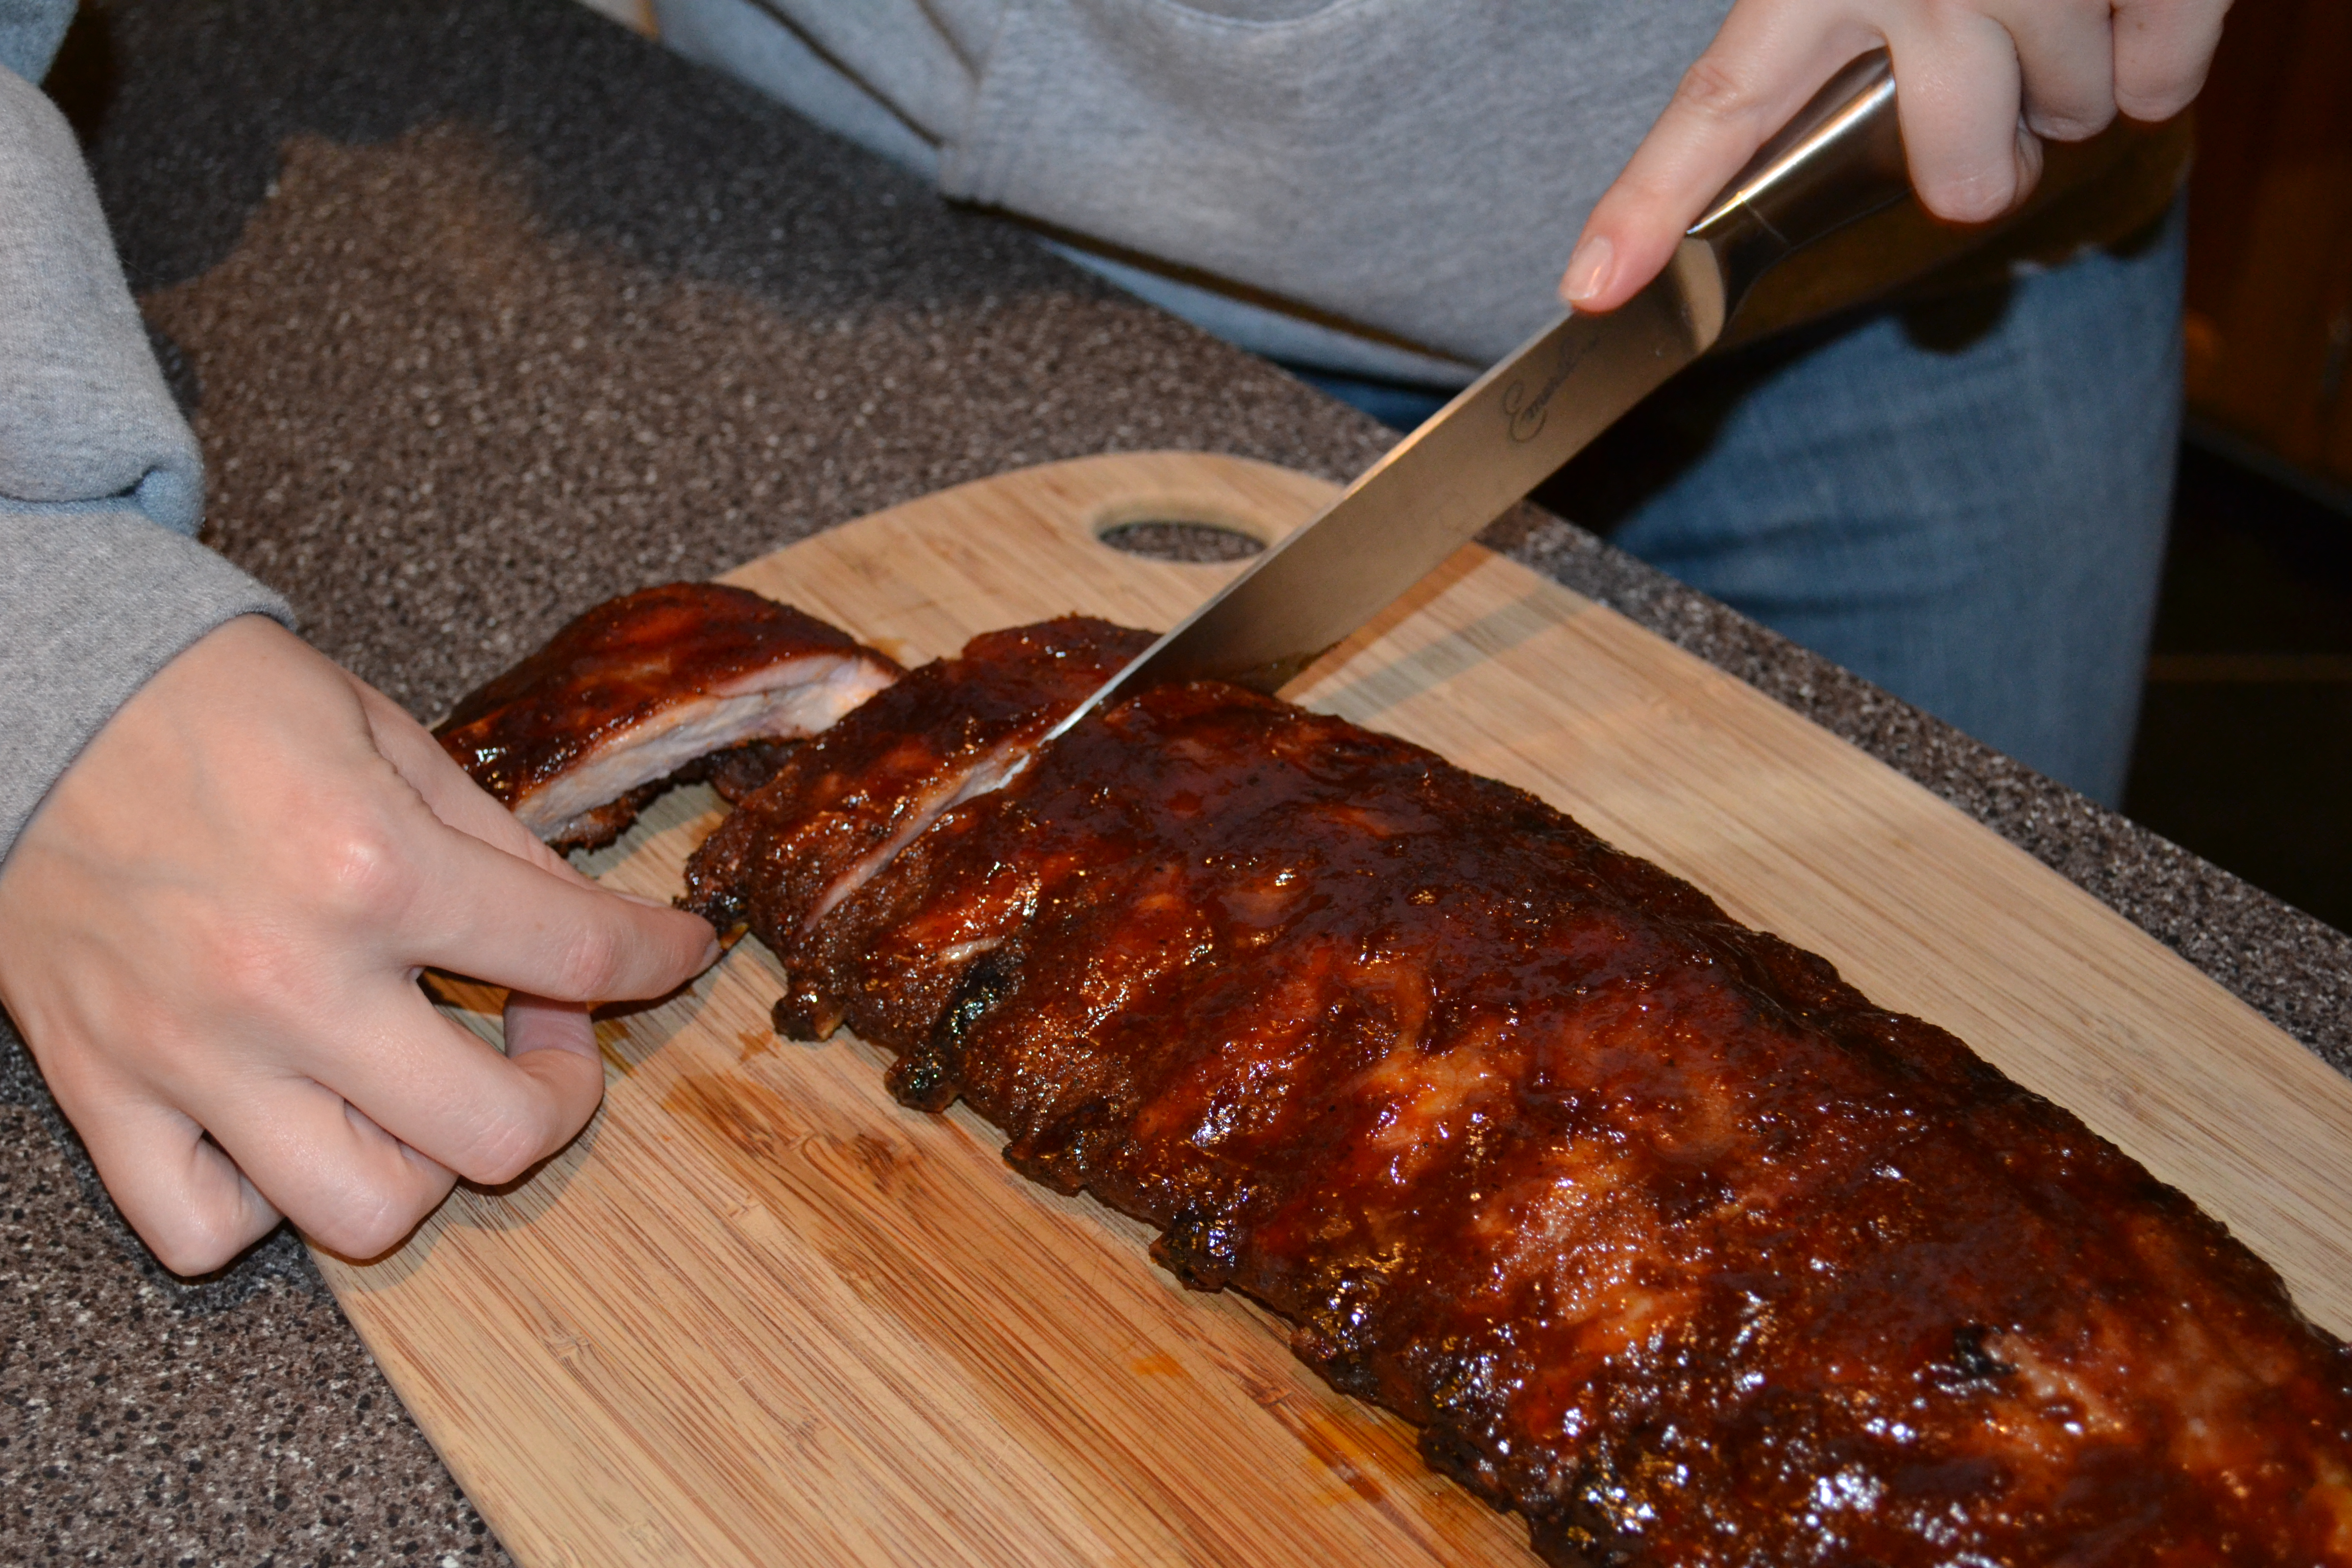
8. Cut the ribs along the bone and enjoy!
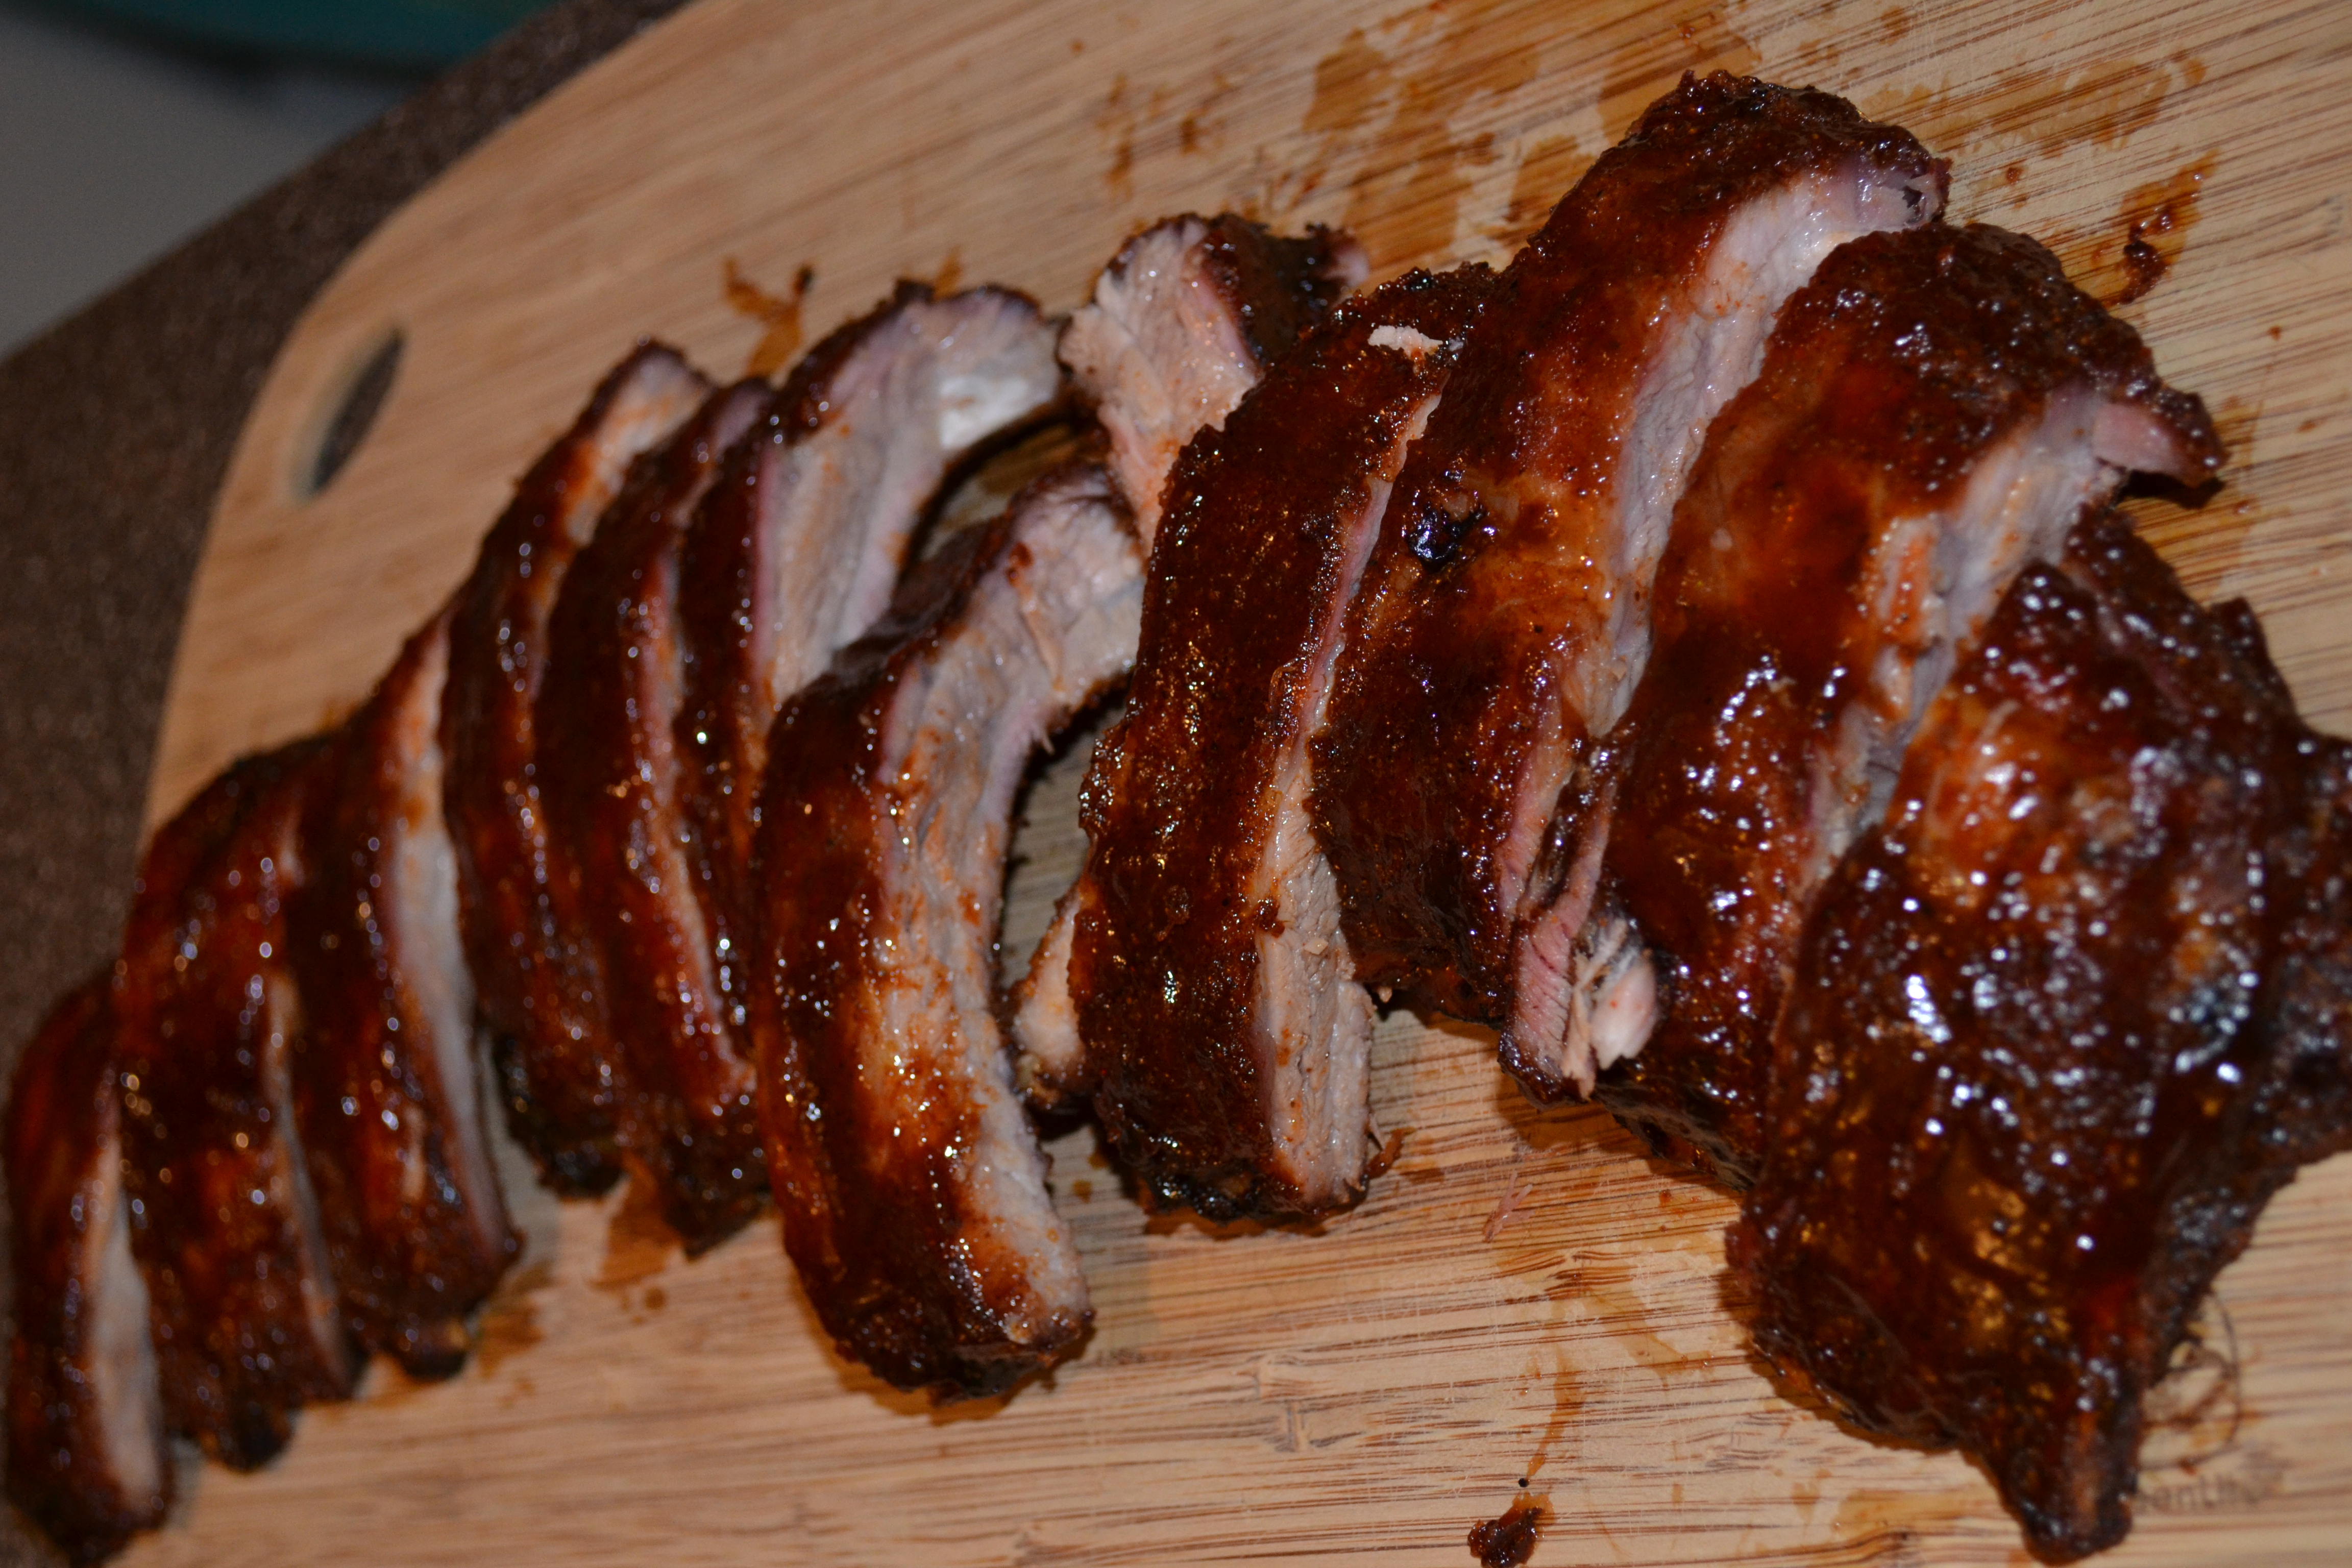
Finished Ribs all ready to eat
It does take about 5 hours total with prep time, but since a lot of the time is spent with the ribs resting, the entire process is really pretty easy! So what’s your favorite food to cook on the grill?
Important Healthy Facts:
Time: 3 hour prep time, 2 hour cook time
Yields: 3-4 servings (4-5 ribs per/person)
Calories: appx. 232 (this is just for the meat and does not include the brown sugar or bar-b-que sauce if you used any)
Penne Pasta with Spinach and Goat Cheese Sauce Recipe
August 19, 2013
If there is anything you need to know about me, it’s that I love pasta and chocolate (not necessarily together though.) I could probably eat pasta 7 days a week. I’m part Italian and I’ve been lucky enough to have my mom and uncles teach me what they know about Italian cooking and wine making. But, I’m always on the lookout for a good pasta recipe to try. My college roomies and I used to watch Giada on the Food Network after class and talk about how one day we would try out her recipes, especially the one for prosciutto wrapped asparagus (hmm, I still need to try that.) I love her pesto recipe and always make a ton of it during the summer when we’re growing basil in the garden.
So, when I found a Giada recipe for a penne with spinach sauce that looked easy and was healthy I had to give it a try. All I needed was whole wheat pasta, spinach, and a few types of cheese. Jason was excited as soon as I said “cheese.”
Ingredients
1 box whole wheat or multi grain penne
3 garlic cloves
2 ounces goat cheese (I accidentally bought garlic and herb goat cheese)
1 ounce reduced fat cream cheese
6 ounces spinach leaves
2 tablespoons freshly grated Parmesan
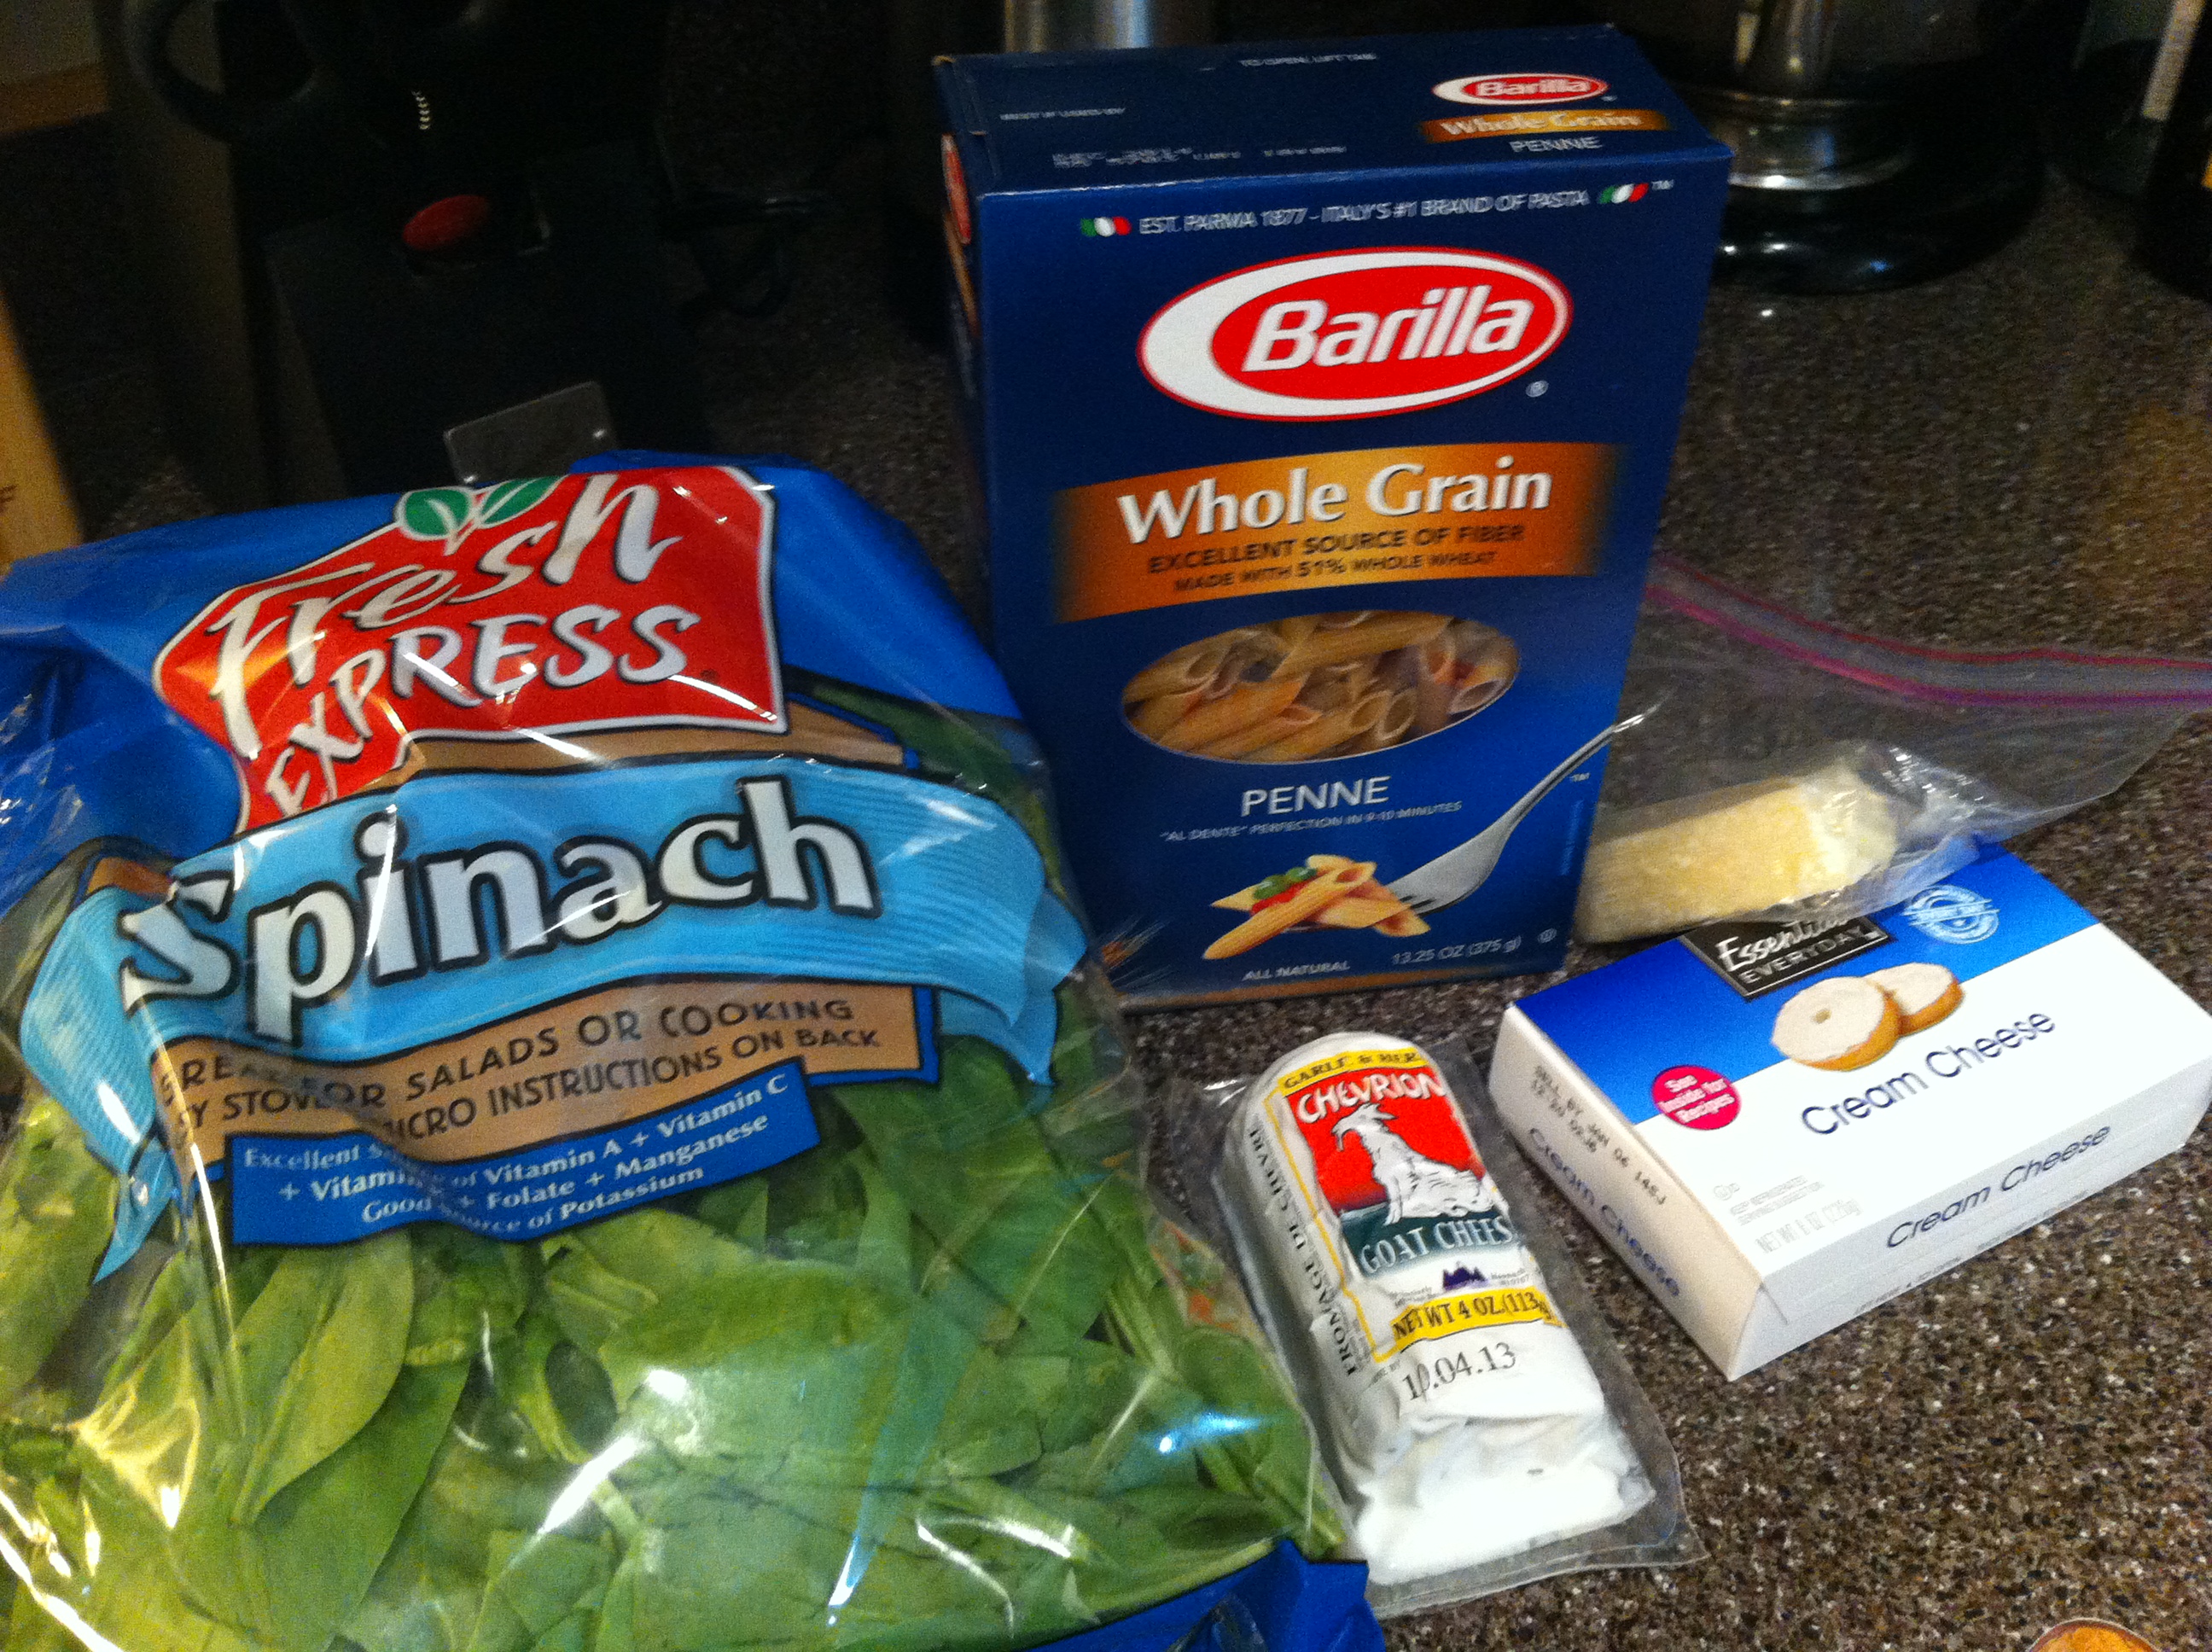
Simple ingredient list!
Instructions
1. Start boiling a large pot of water. I usually add a pinch of salt and a splash of olive oil to the water. Add the penne and cook until it is al dente, stirring occasionally.
2. Mince the garlic in a food processor. I adore my food processor, it makes it so much easier to make sauces and pesto! Add the goat cheese, cream cheese, and half of the spinach leaves. Blend until the mixture is smooth and creamy. Set the cheese and spinach mixture aside.
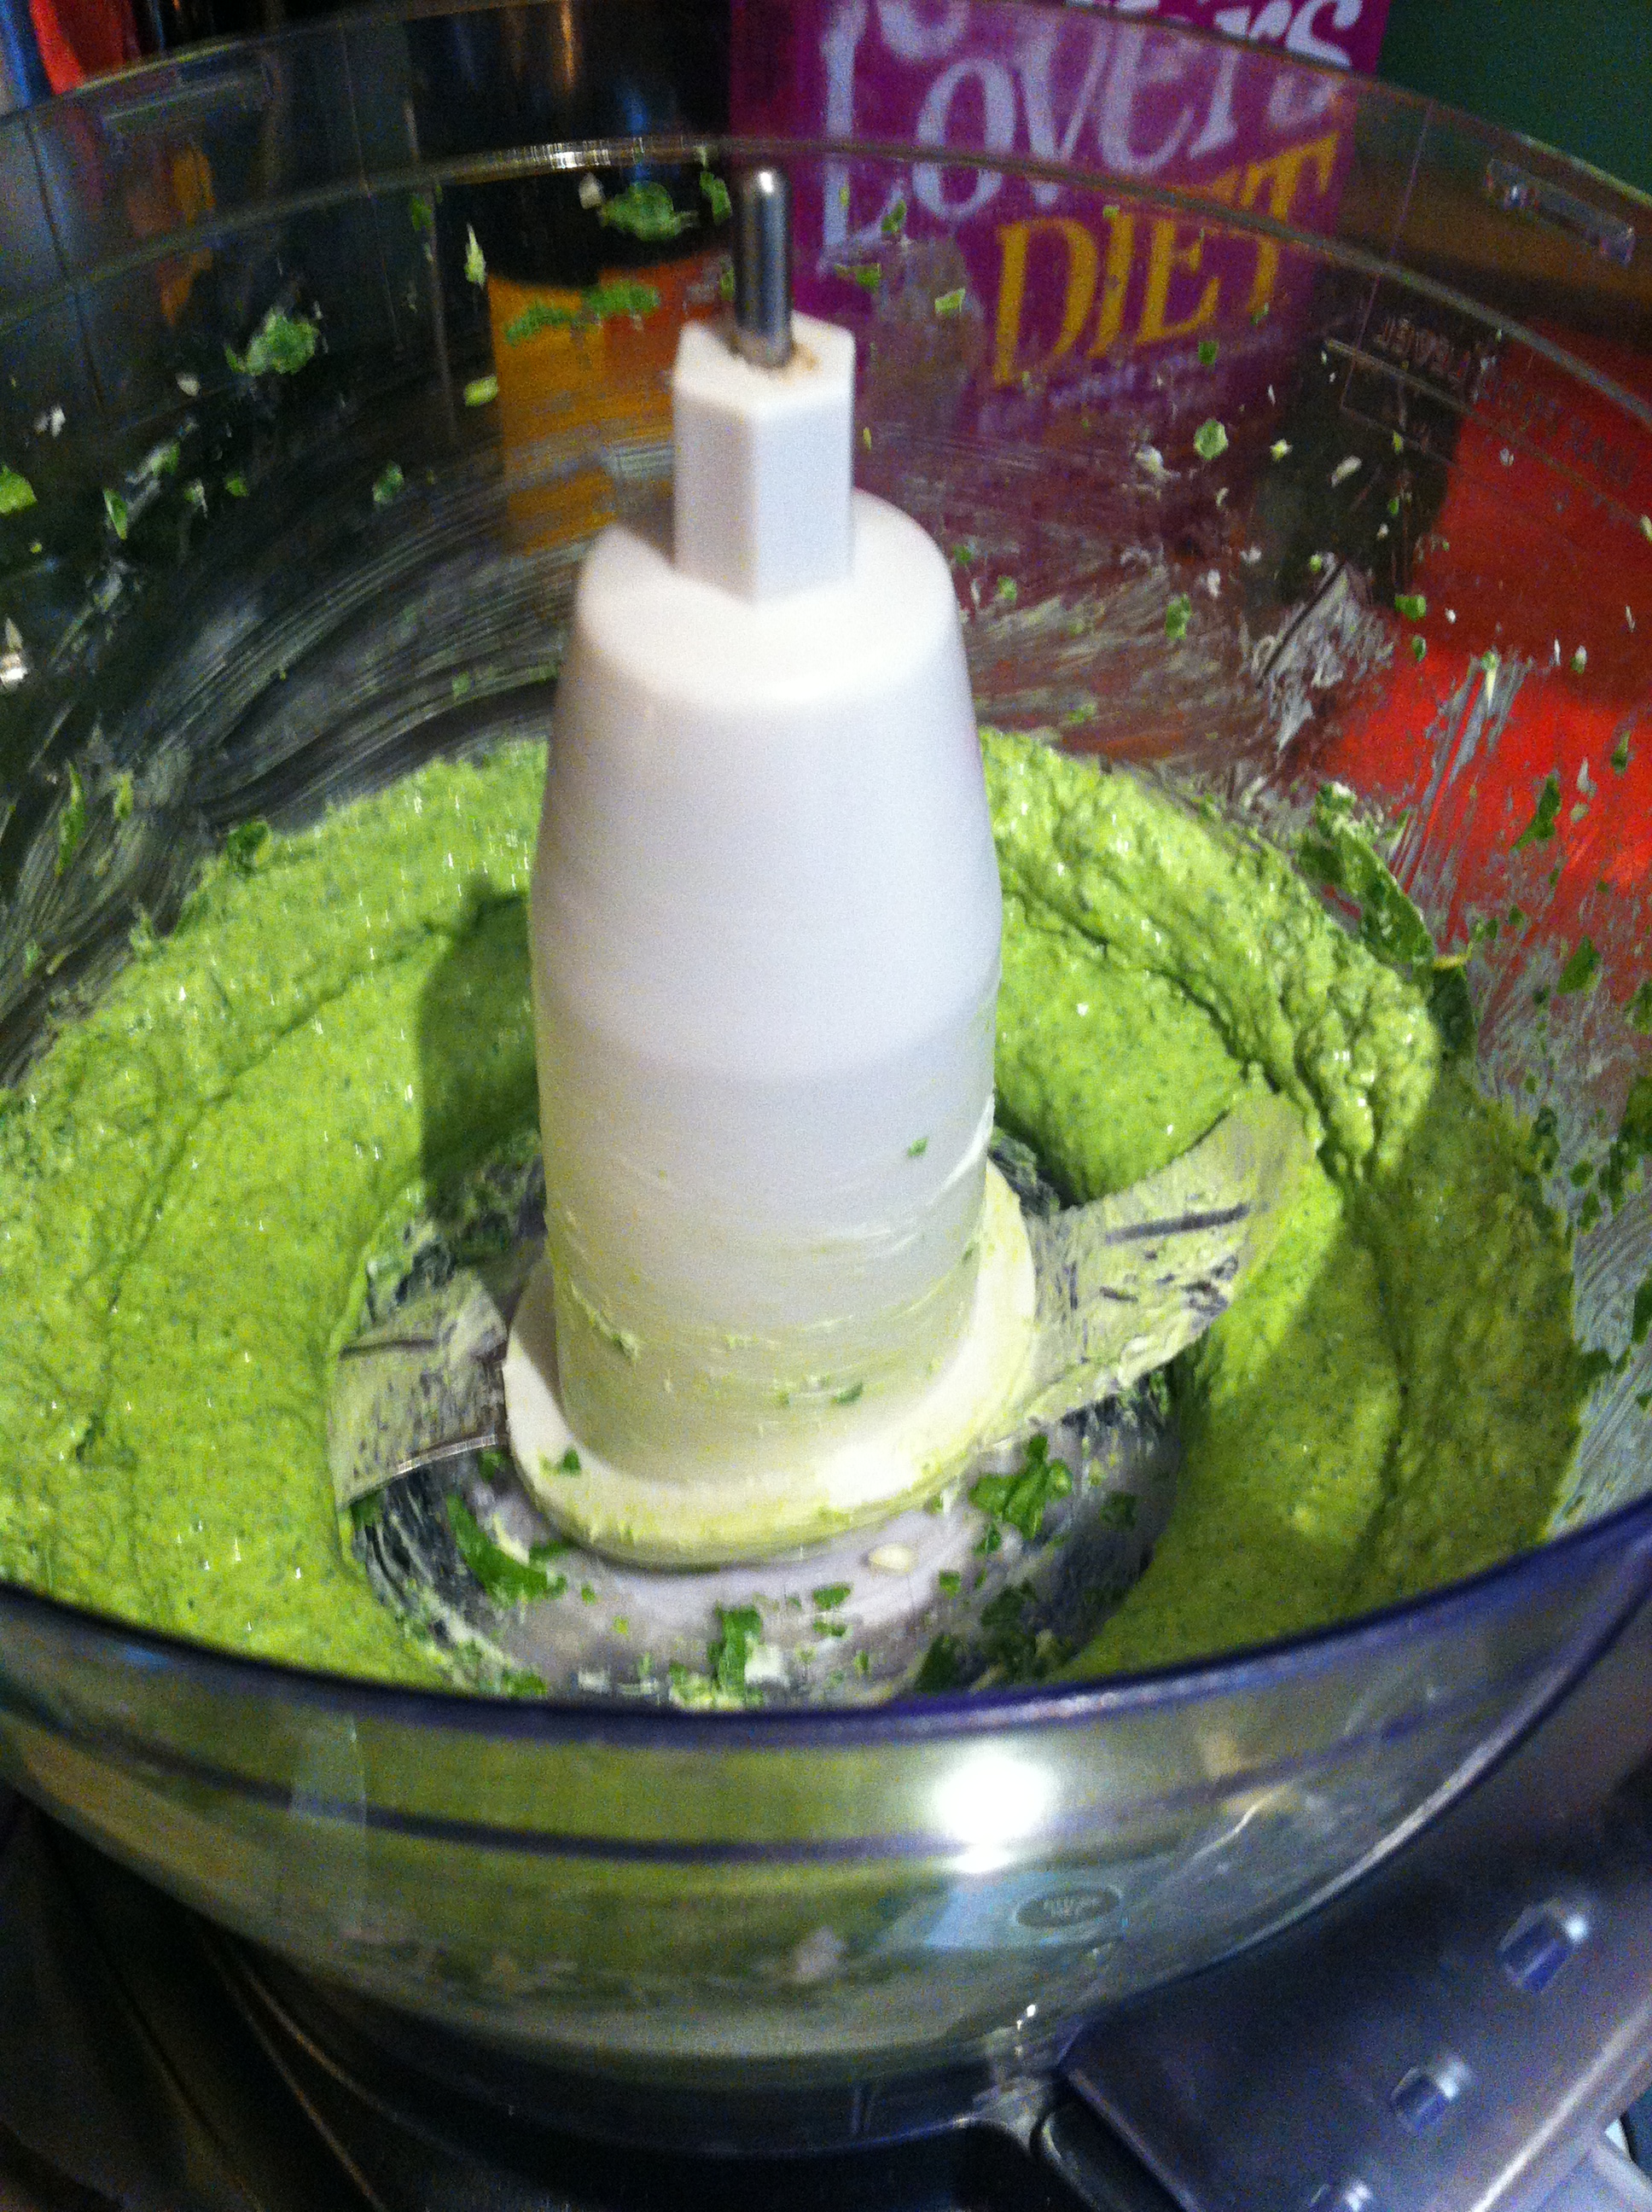
Finished spinach cheese sauce
3. Put the rest of the spinach leaves in a large bowl.
4. Save about 1/2 cup of the pasta water before you drain the pasta (this will help distribute the cheese mixture over the pasta.) Put the pasta over the spinach leaves in the bowl. Scrape the cheese and spinach mixture over the pasta mixture and toss until the pasta is coated. Add the reserved pasta water while you’re tossing the pasta, just enough to moisten the pasta. Sprinkle the Parmesan cheese over the top and serve!
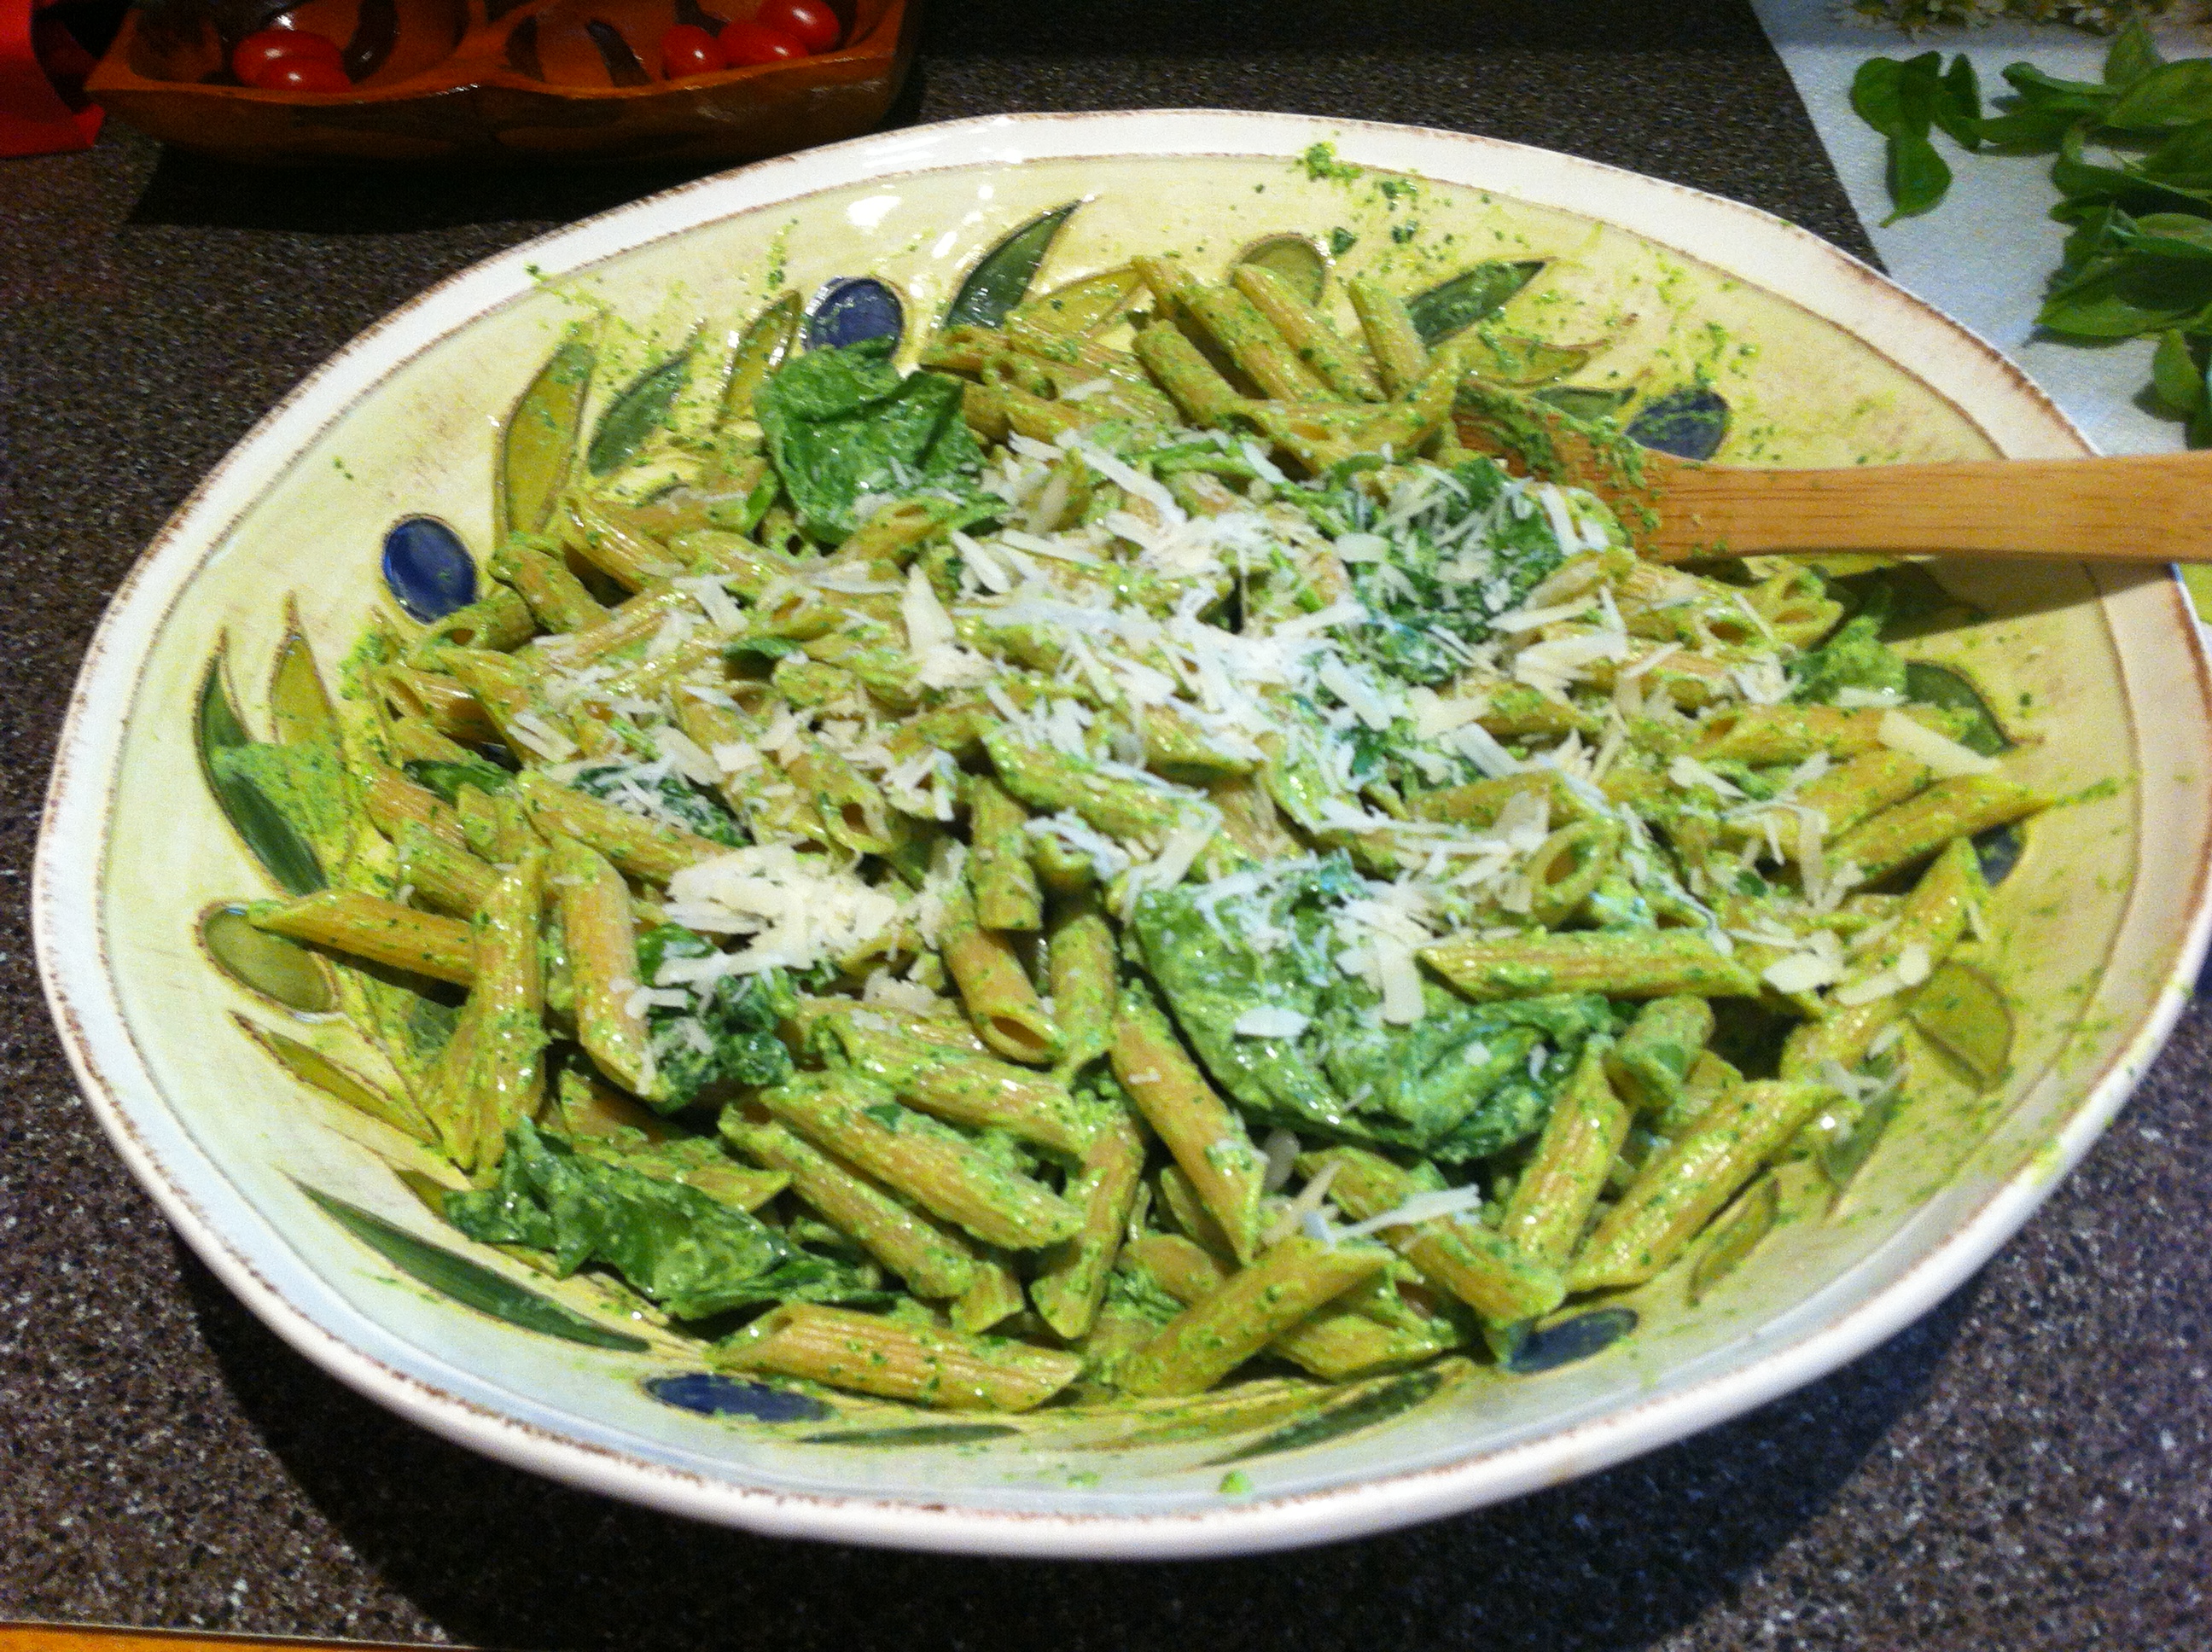
Final pasta dish
The entire recipe did not take long at all, about 20 minutes total! Perfect to throw together after a long day at work. It looked pretty when it was all done, and tasted delicious too! The sauce was creamy, the goat and cream cheese together was yummy. I’m not a huge fan of strong cheeses (I can tolerate blue cheese, but in small doses.) You couldn’t tell that you were eating a whole wheat pasta either, it did not taste dry at all!
Jason and I always vote on new recipes, either keep it or pitch it. We are definitely keeping this one…but we’d change a few things. I thought it was a little strong on the garlic…probably because I used all 3 garlic cloves AND the garlic and herb goat cheese. (Sorry hon!) Jason thought the sauce could have been creamer, so we decided to double the amount of cream cheese and/or use more pasta water next time. I only ended up using about 2 tablespoons of the pasta water so next time I’ll be sure and use more.
If you give this a try, let us know what you think!
Important Healthy Facts:
Yields- 6 servings
Appx Calories per serving- 326